A preloader — or what some call a loading screen — is the what you see on some sites before the main content of the web page is loaded.
Preloaders can be anything! They can be super simple or animation-laden. Their main purpose is to entertain site visitors while the actual content of the page is still loading in the background.
Some might argue whether you should or shouldn’t use a preloader, however, since you’ve landed on this page, we assume you want to learn how to build one in Webflow. In this lesson, we’ll show you how to make a preloader and two loaders using interactions: the simplest loader ever and an animated loader.
Building a preloader
- Designing the preloader
- Creating a loader
- Setting the initial state of the preloader
- Hiding the preloader once the page loads
Before you get started
To create this preloader, you'll be using:
- Div blocks
- A text block
- Flexbox
- Fixed position
- Z-index
- Background styles
- Display settings
- Width and height values
- Border radius
- Triggers and animations
If you're not familiar with any of these elements or properties, check out their guides and how to use these tools before you get started with this tutorial.
Designing the preloader
The preloader is made up of the main preloader container and a loader. To create the main container of the preloader:
- Drag a div block from the add panel right into the page body. Add a class and name it "preloader".
- Enable flexbox. Justify and align its children to the center.
- Adjust the positioning — set the position to fixed. Make sure to select full so it fills up the whole viewport. Set the z-index to some obscenely high number like 99999. This means it'll appear on top of all other elements.
- Set a background color
Creating a loader
To create the simplest loader, just drag in a text block. Doubleclick it and type "loading...". And that's it. That's the basic design.
Pro tip
You can add any element or asset in your preloader container — from animated gifs to videos of animated loaders, to Lottie animations.
If you add gifs or videos, make sure they aren’t too large. You don’t want the preloader to take more time to load than your site. Lottie JSON animation files, on the other hand, are much smaller in size and highly adaptable. Once uploaded to Webflow, they are rendered as SVG animations. SVG files scale better than any other formats without losing any quality, so they render pretty well at any resolution.
If you add animated loaders (gifs or a video), make sure they aren’t too large. You don’t want the preloader to take more time to load than your site.
Creating an animated loader - the bouncing ball
You can also make animated loaders using Webflow Interactions. Here, we’ll show you how we made this bouncing ball loader.

- Create a ball using a div block. Just set a width and height of 30x30px, fill the background color, add a 50% radius.
- Create a page load trigger in the interactions panel. Create a new animation for when the page starts loading.
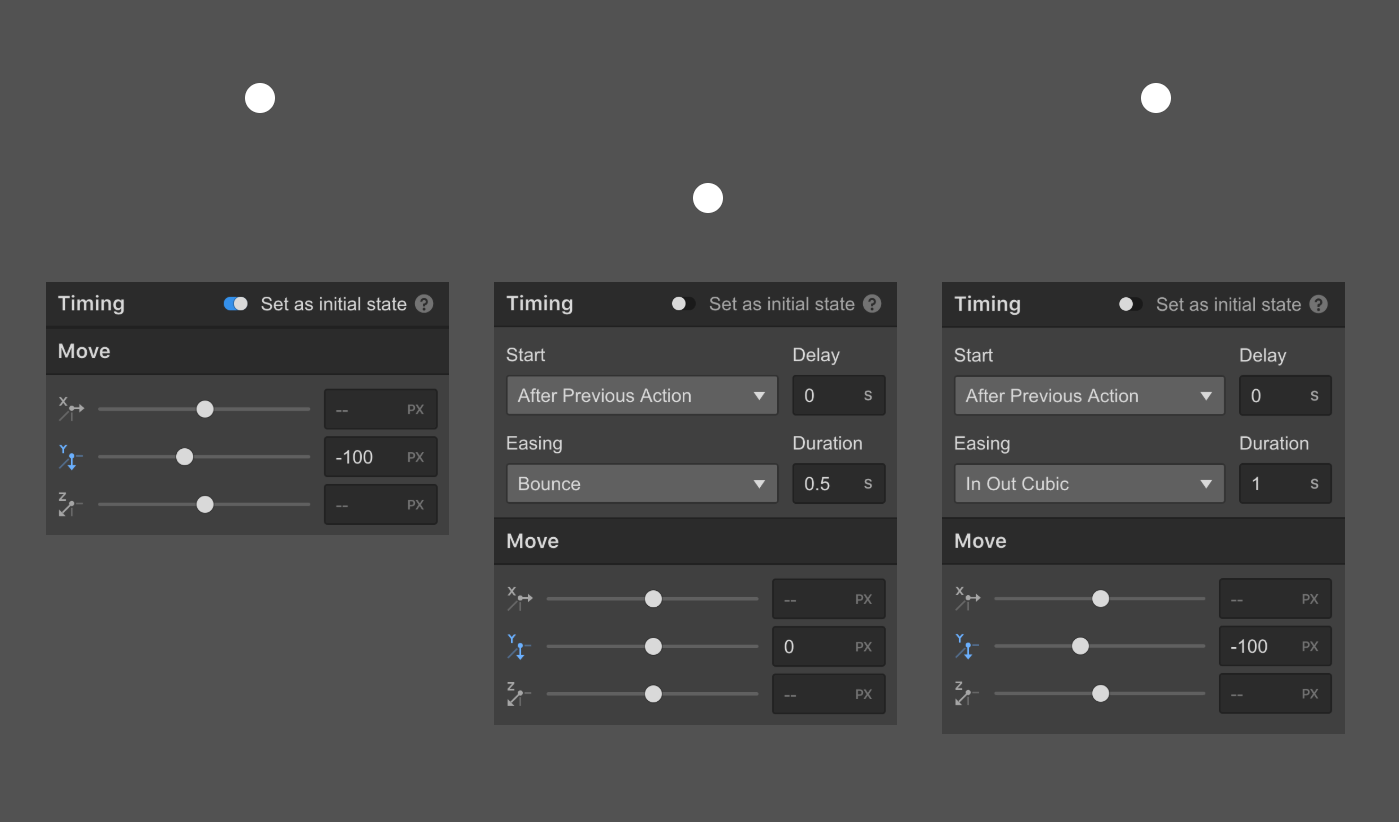
- Select the ball on the canvas and add some animation actions. Here’s how we’ve done it:
- Action 1 — move the ball up by setting the y-axis, Y = -100 — set this as initial state
- Action 2 — move the ball back to Y=0 — duration 0.5 — easing = bounce
- Action 3 — move the ball back up to Y = -100 — duration 1 — easing = in out cubic

- Close the animation and set it to loop
Setting the initial state of the preloader
Now that you’ve created the preloader, you can hide it so you can work with your other elements on the page without having the preloader covering everything. So, select the preloader and set the display setting to none.
Creating the interaction
- Make sure the preloader div block is still selected
- Go over to the interactions panel and add a page trigger: page load. And, start a new animation under when the page finishes loading.
- Create a new timed animation here and give it a name.
Setting the initial state
- Add a new timed action of hide/show. And, set the display setting back to flex. This makes it visible again.
- Make this action the initial state.
Hiding the preloader once the page loads
The initial state controls what everything looks like when the page first comes up. To make your preloader disappear once the page finishes loading:
- Add a new timed action that sets the opacity to 0%. Change the duration if you want this animation to occur faster.
- Set the display setting to none. This will hide the preloader after it fades out (opacity hits 0%).
Pro tip
If you want to ensure that the preloader shows up for a set amount of time (a minimum), select the first action (the opacity change) and delay it so it occurs after, say, half a second. That means, even after the page loads, it'll hold for a half-second before starting to disappear.
And that's setting up a preloading animation!


