Workspaces give you the option to design on your own or create a shared space where you can work on sites with your teammates, clients, contractors, or anyone else working in Webflow with you.
In this lesson you’ll learn:
- How to understand a Workspace
- How to create a Workspace
- How to edit Workspace settings
- How to upgrade your Workspace plan
- How to switch your Workspace plan’s billing frequency
- How to downgrade your Workspace plan
- How to add and remove seats on a Workspace plan
- How to add and remove Workspace members
- How to access Workspace billing details
- How to delete a Workspace
- How to understand proration and refunds
How to understand a Workspace
A Workspace is a way for you to choose how you’d like to design your Webflow sites — either individually, or with collaboration from teammates, contractors, or clients.
Your Workspace plan helps determine the level of collaboration you need. For instance, you’ll begin with a free Starter Workspace. As your team grows or your needs scale, you can upgrade to a paid Workspace plan to add team members, increase unhosted site limits, and unlock additional features to work faster and more efficiently.
There are different types of paid Workspace plans depending on who you work with:
- Workspaces for in-house teams (Core or Growth plans)
- Workspaces for those building sites for clients (Freelancer or Agency plans)
For a detailed comparison of the different features available on different Workspace plans, check out our pricing page.
Important: Workspace plans do not provide hosting, and are billed separately from any Site plans you have in place. To manage your Site plans and add hosting to the sites in your Workspace, read Manage Site plans.
How to create a Workspace
When you sign up for Webflow you begin with a free Starter Workspace. You are the sole member and owner of this Workspace and can create up to 2 unhosted sites in it.
Good to know: You can only have one Starter Workspace per account.
To add teammates to your Workspace, gain access to roles and permissions controls, export your code, and unlock more unhosted sites, you’ll need to upgrade your Workspace to any paid Workspace plan. For detailed information about which features are included in each Workspace plan, please refer to our pricing page.
You may want to keep your Starter Workspace for your individual work, but create a new, additional Workspace to use when collaborating with teammates. You can create a new Workspace in 2 different ways:
- Create a new Workspace from the Workspaces dropdown menu
- Create a new Workspace from the Workspaces overview page
Create a new Workspace from the Workspaces dropdown menu
- Open your Dashboard
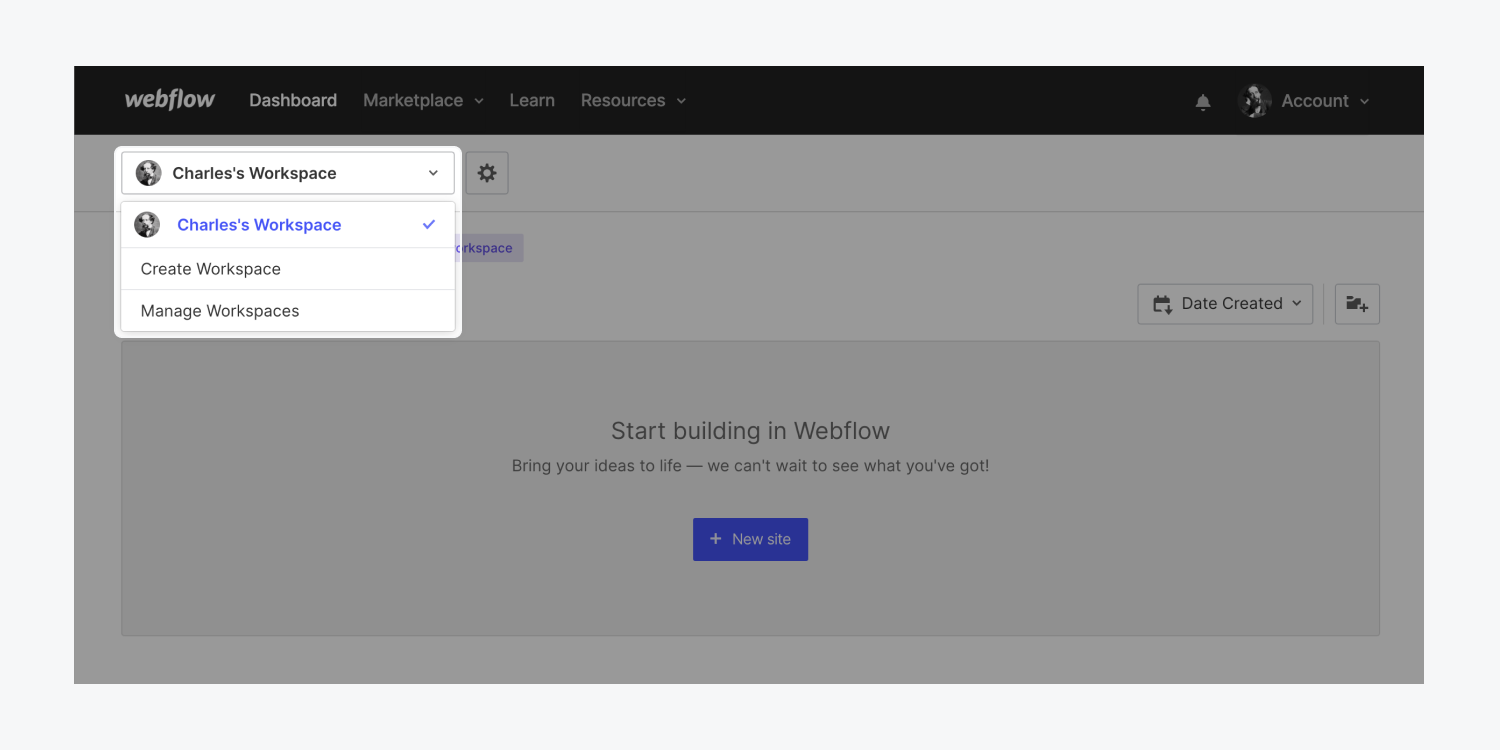
- Hover over the Workspaces dropdown menu in the top left of the Dashboard
- Choose “Create Workspace”
- Give your Workspace a name and click “Create your Workspace”
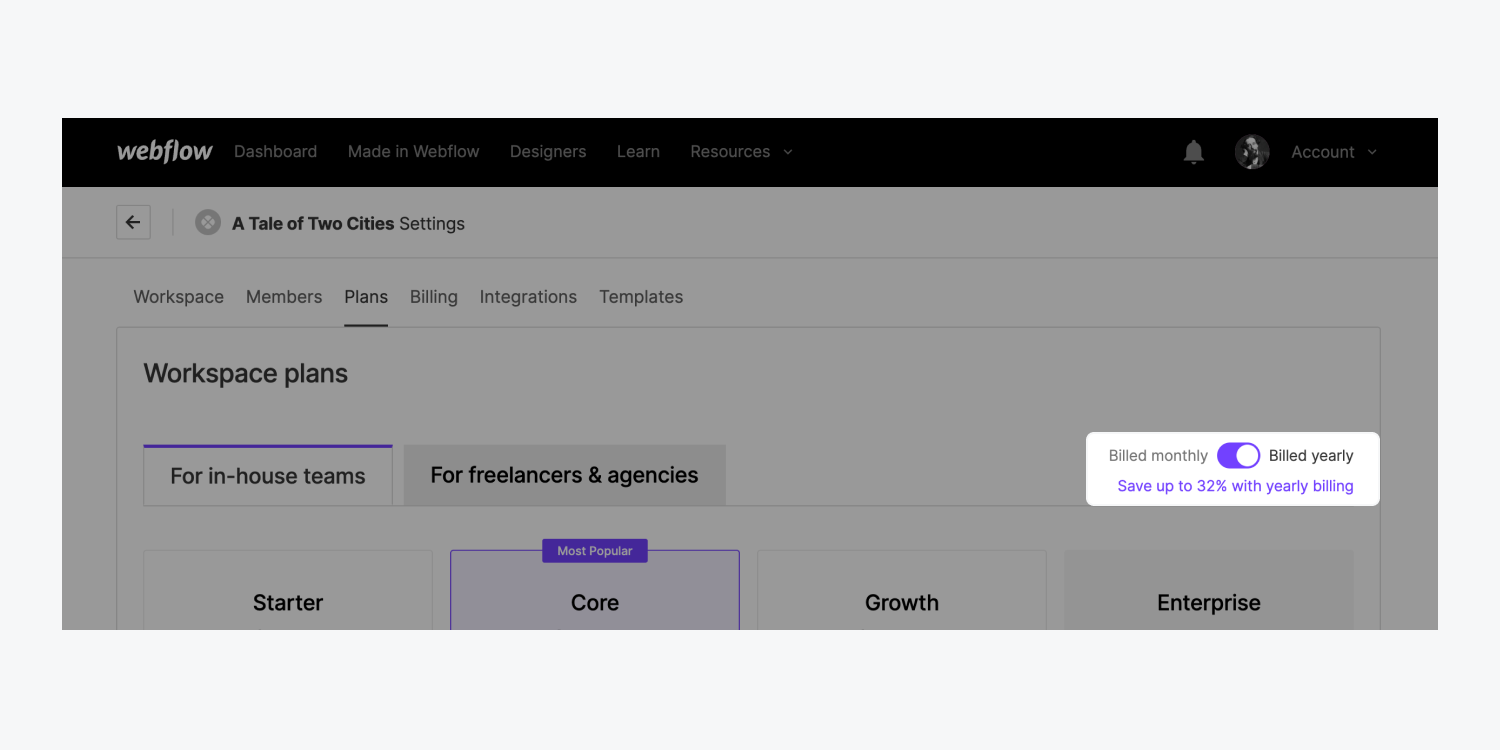
- Toggle Billed monthly or Billed yearly
- Add the Workspace plan that fits your needs (from either the “For in-house teams” tab or the “For freelancers & agencies” tab)
- Select the number of seats (you can always add or remove seats later if you need to)
- Add your payment information
- (Optional) Enter a promo code if you have one
- Pay for your plan
Good to know: Yearly pricing gives you the ability to pay for a plan up front at a discounted rate. Paying for a plan up front can save up to 32% compared to paying monthly.
After you have successfully purchased your new Workspace, you will be taken to the Dashboard of your new Workspace.
Create a new Workspace from the Workspaces overview page
- Open your Dashboard
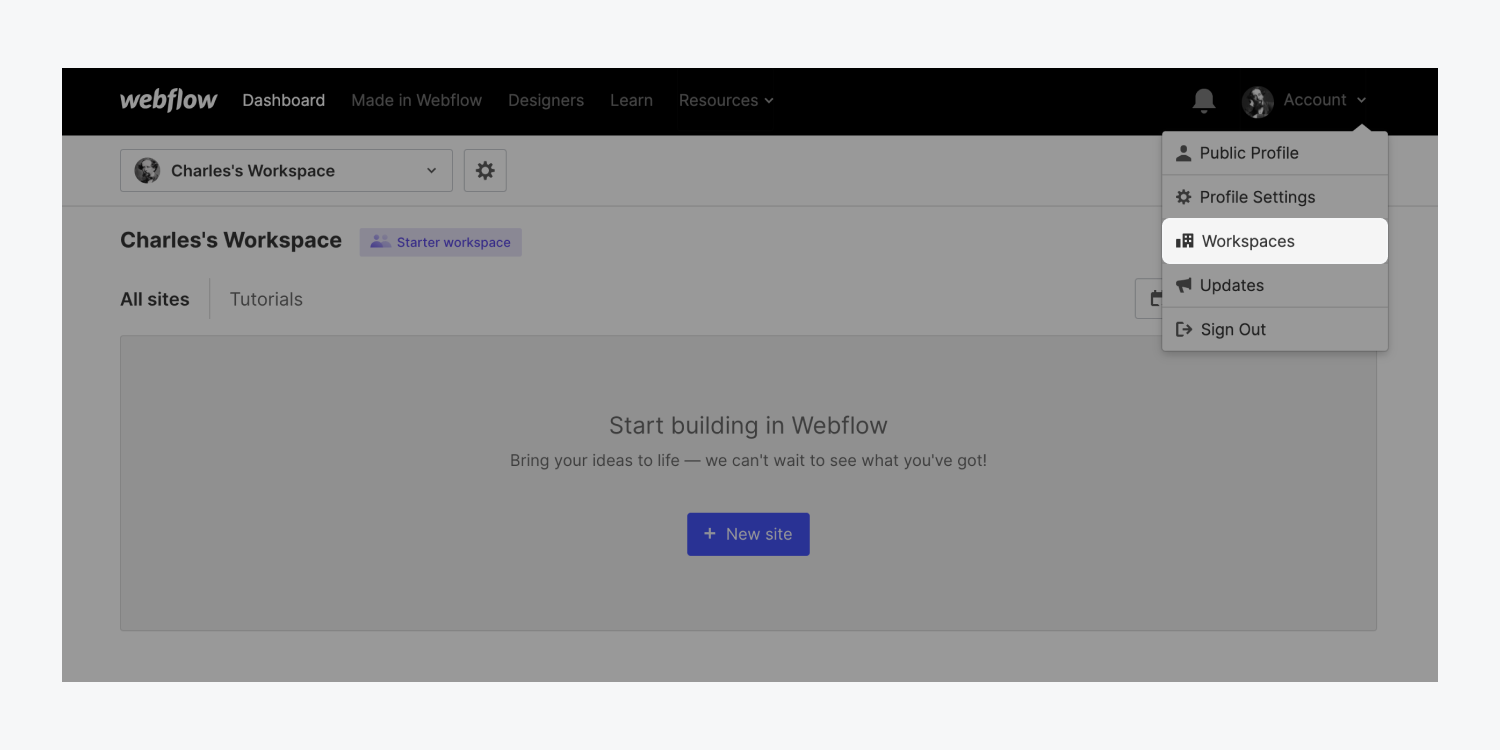
- Click the Account dropdown menu in the upper right of your Dashboard
- Choose Workspaces
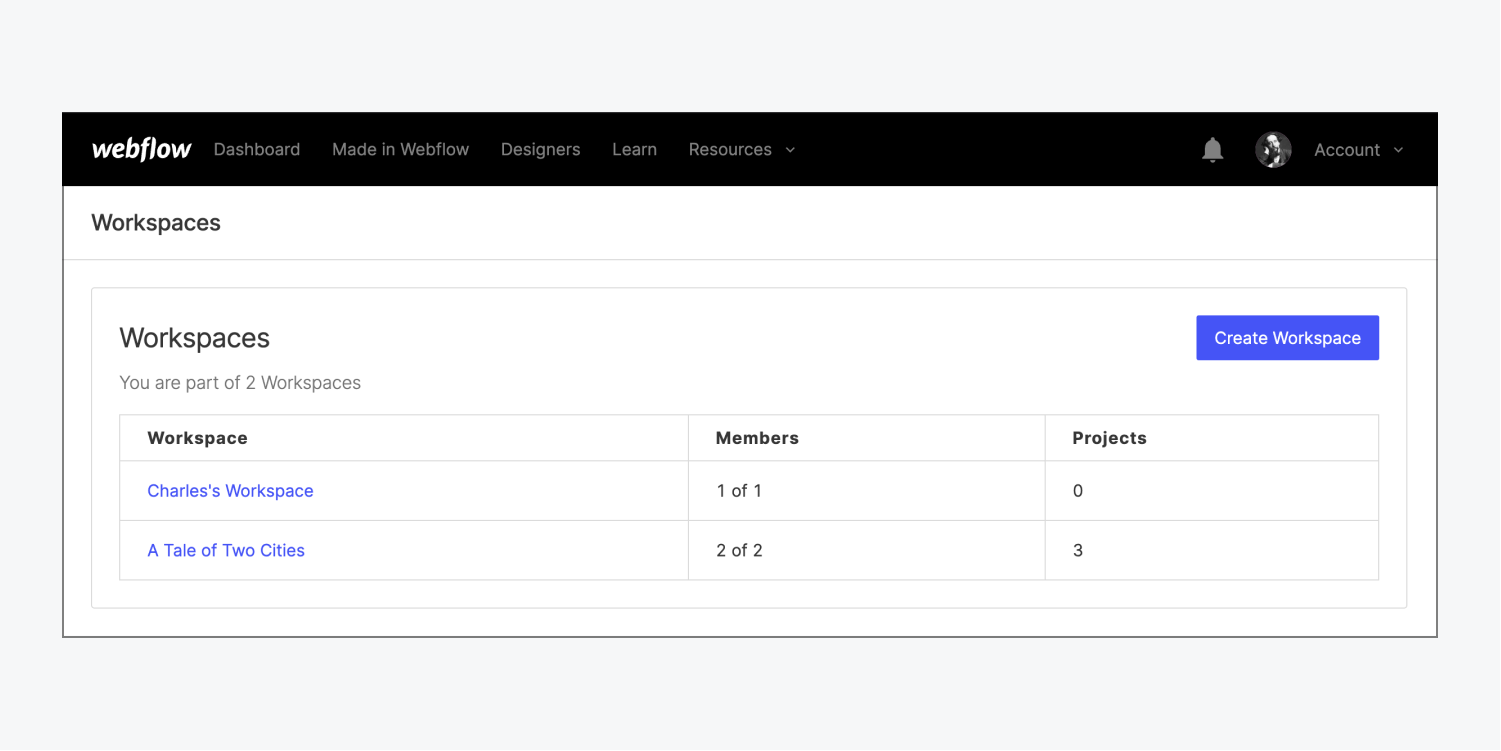
- Click “Create Workspace”
Follow steps 4 through 9 outlined above in Create a new Workspace from the Workspaces dropdown menu.
How to switch between Workspaces
After you’ve created a new Workspace, you can switch between any of the Workspaces in your account to quickly see sites contained in each, and access that Workspace’s settings:
- Open your Dashboard
- Hover over the Workspaces dropdown menu in the top left of the Dashboard
- Choose the Workspace you want to access
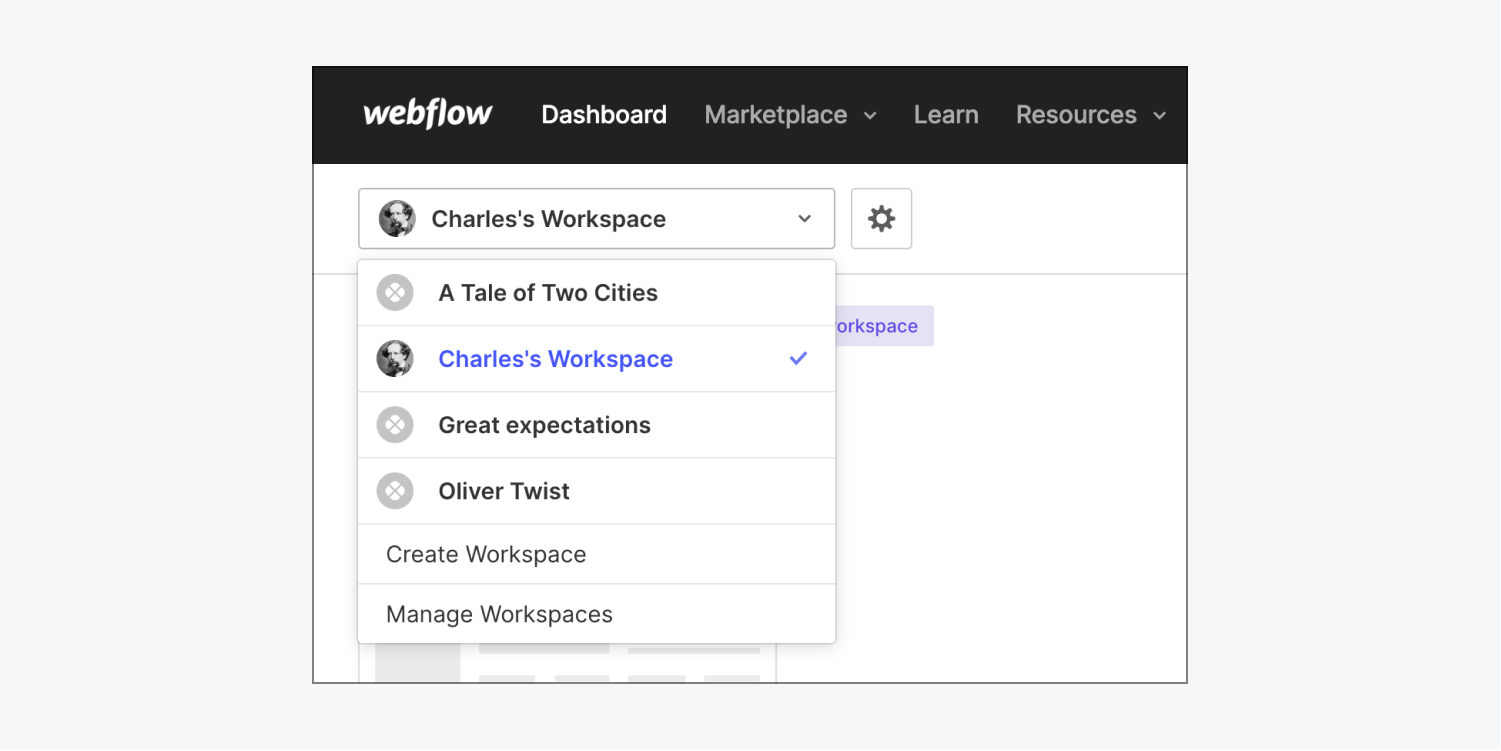
Note: The Workspaces dropdown menu displays your default Workspace at the top, with additional Workspaces sorted alphabetically. If you’re part of many Workspaces, scroll through the dropdown to view your entire list of Workspaces. To choose the Workspace you’d like to automatically display after logging in (i.e., your default Workspace), go to Workspace settings > Workspace tab. Read more about the settings you can manage in the Workspace tab.
How to edit Workspace settings
You can access your Workspace settings in 1 of 2 ways:
- Access your Workspace settings from your Dashboard
- Access your Workspace settings from the Workspaces overview page
Access your Workspace settings from your Dashboard
- Open your Dashboard
- Check that you are in the correct Workspace
- Click the “cog” icon to open your Workspace settings

Access your Workspace settings from the Workspaces overview page
The Workspaces overview page is a great way to get a quick glance of all the Workspaces you belong to:
- Open your Dashboard
- Click the Account dropdown menu in the upper right of your Dashboard
- Choose Workspaces
- Click the name of any of your Workspaces
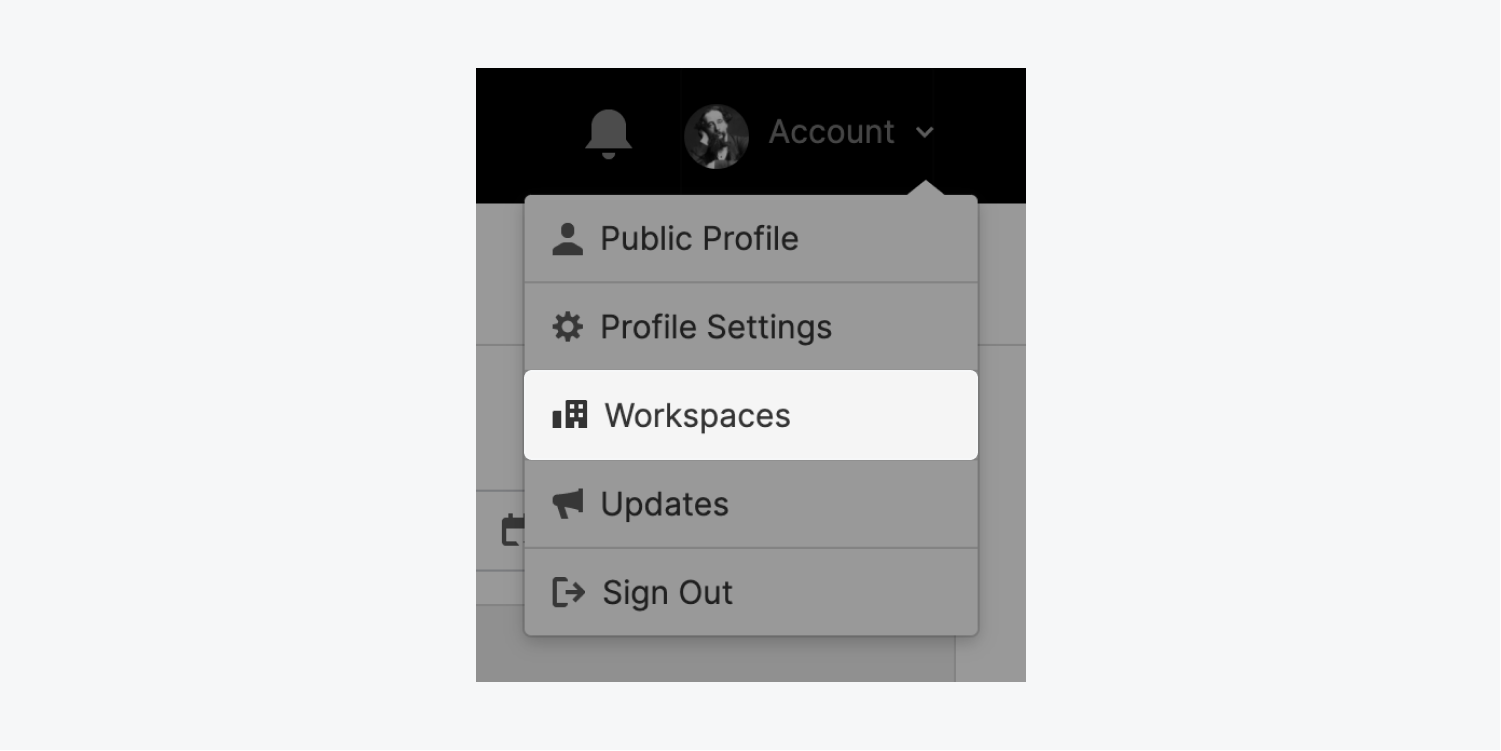

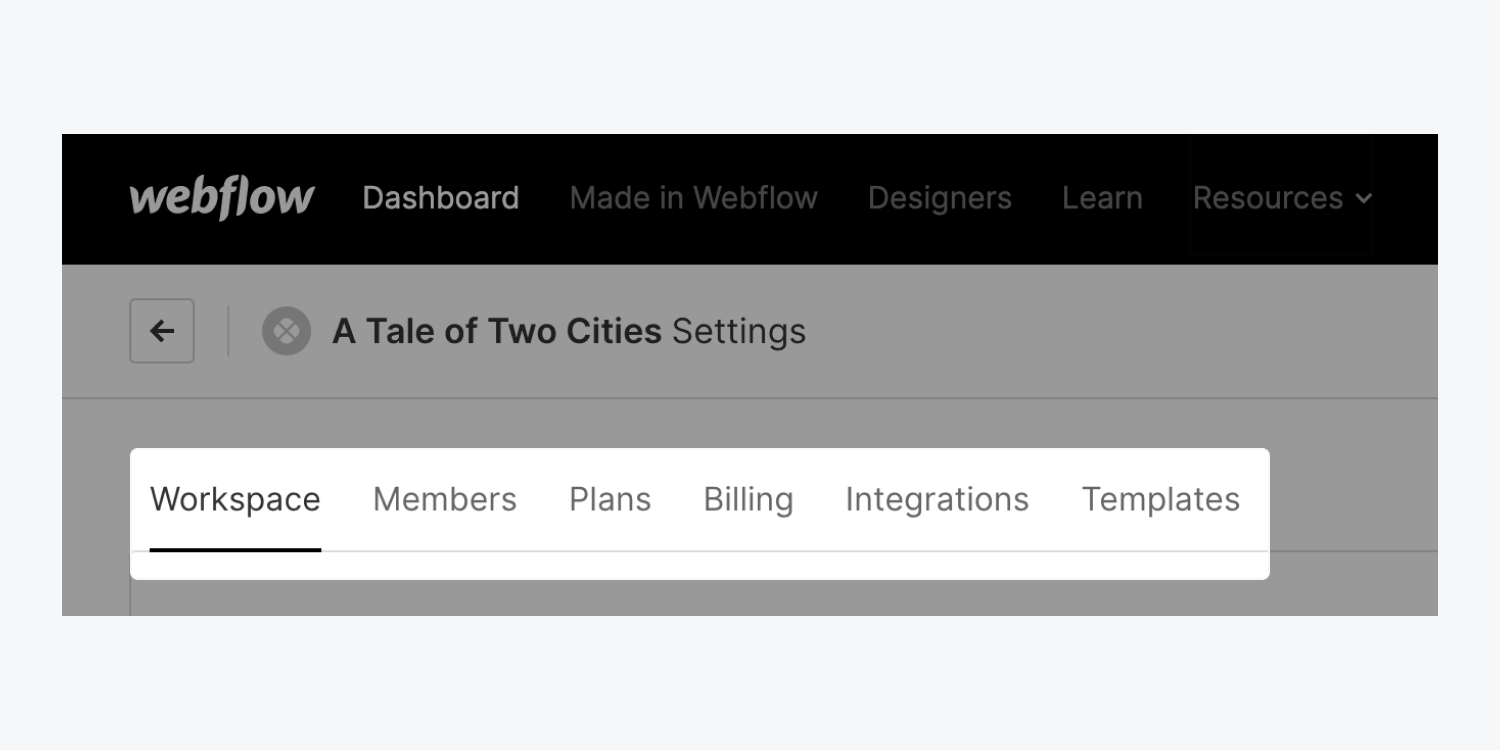
Your Workspace settings allow you to view and edit information in 6 tabs. Let’s walk through the:
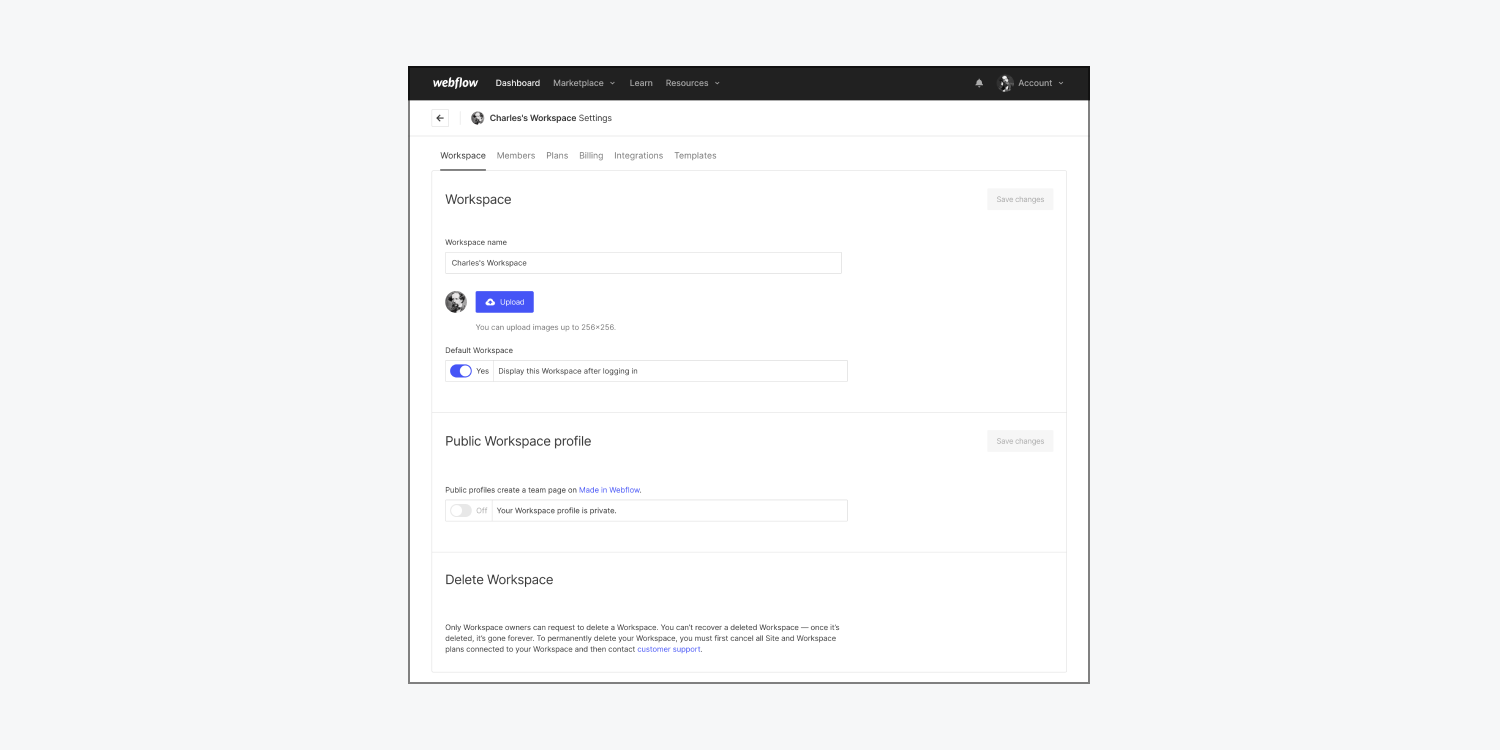
Workspace tab
By default, your Workspace settings opens to the Workspace tab. You can change the name of your Workspace, upload a new image to replace the default Workspace icon, choose to display a Workspace by default after logging in, turn your public Workspace profile on or off and edit your profile details, or delete your Workspace.
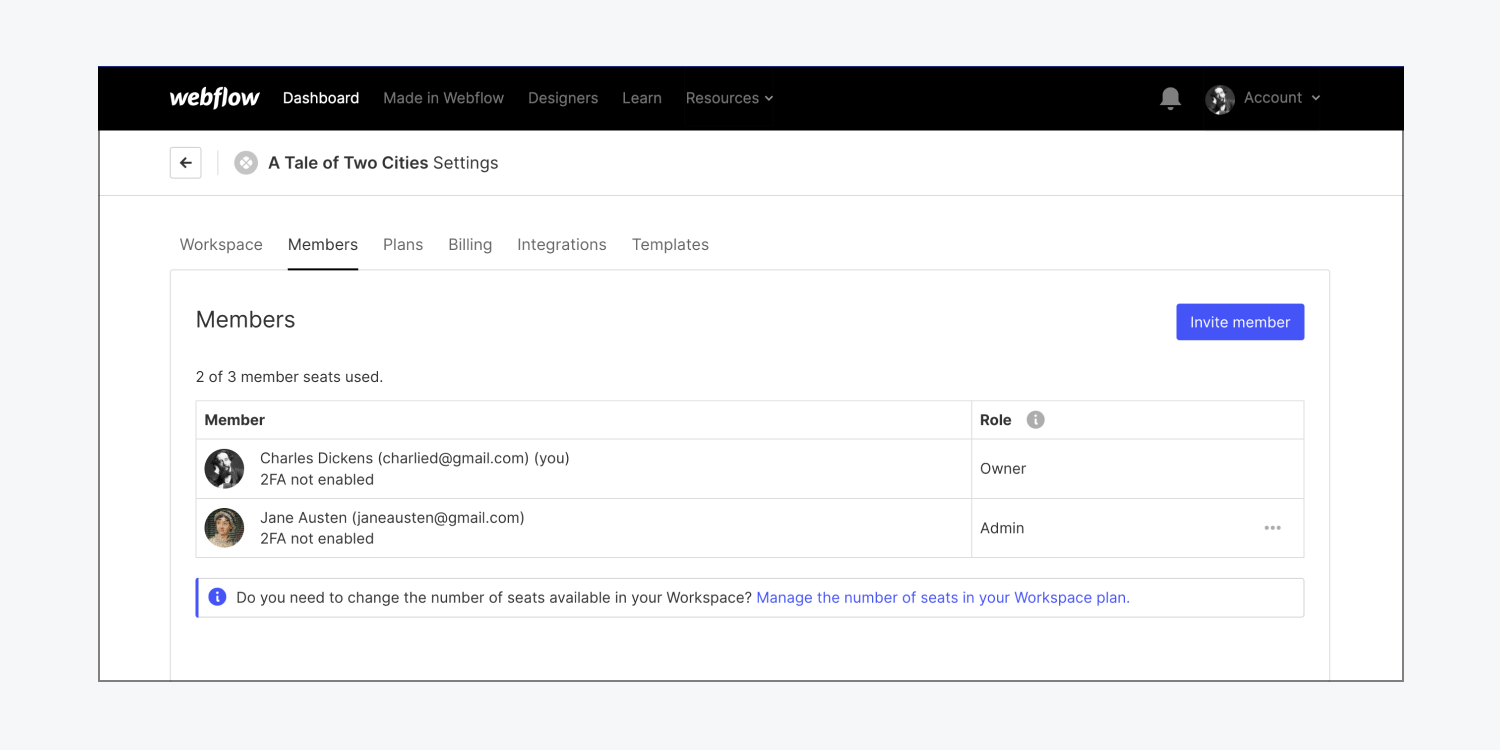
Members tab
After opening your Workspace settings, choose the Members tab to see the number of members in your Workspace and how many seats they fill. You can also add and remove members, and, if your Workspace is on a paid Workspace plan, you can change members’ Workspace level permissions. Learn more about Workspace roles and permissions.
Plans tab
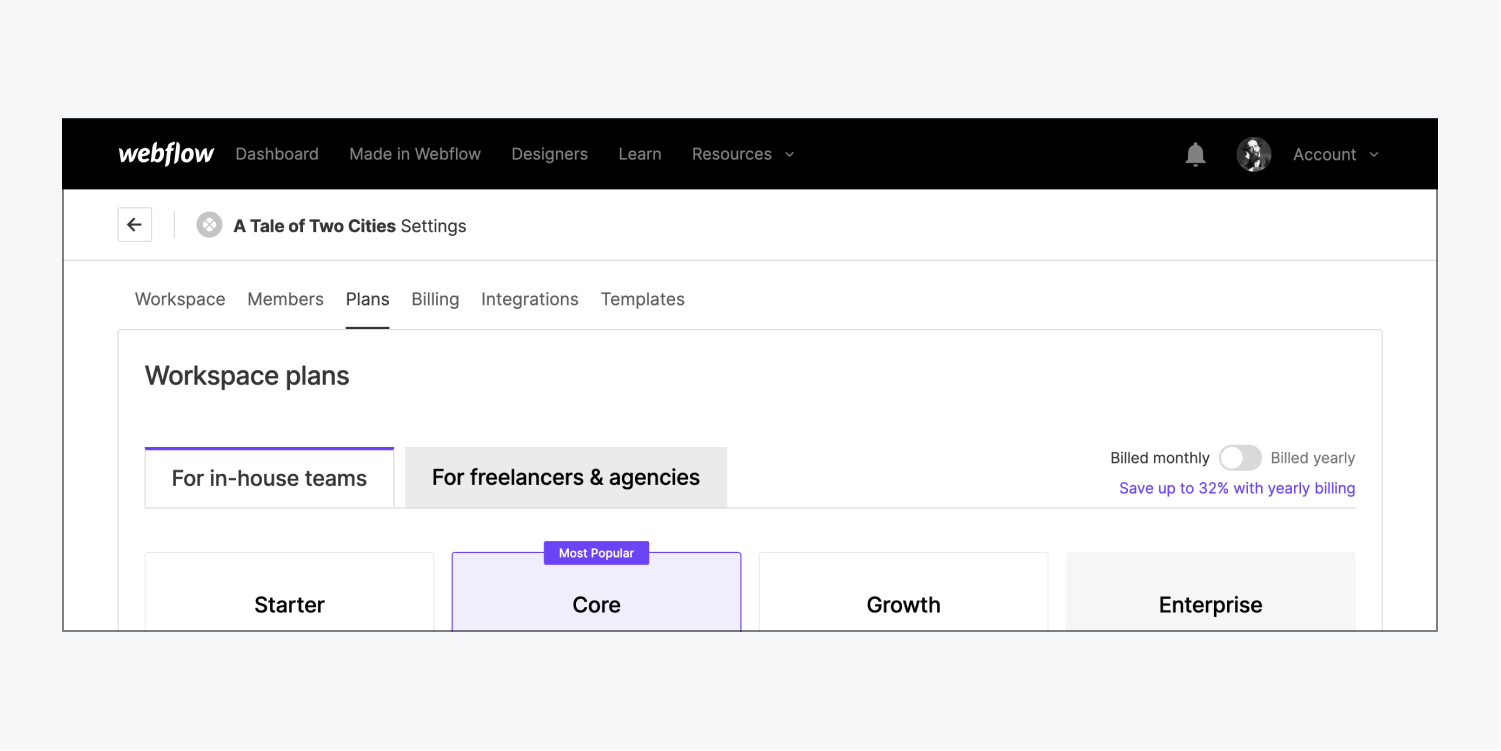
After opening your Workspace settings, choose the Plans tab to view the Workspace plan you’re on.
There are 2 Workspace plans tabs to choose from: For in-house teams and For freelancers & agencies. Click on either tab to choose a Workspace plan that fits your needs best. You can also upgrade or downgrade your Workspace plan from here, and can scroll down to see a detailed comparison of plan features.
If you have unhosted sites in your Workspace, scroll to the bottom of the page where you’ll find a section that allows you to quickly add a site plan to any of your unhosted sites.
Select a site from the dropdown menu and click Go to site to be taken to the site’s Site settings > Plans & Billing tab, where you can add a Site plan to it.
Billing tab
After opening your Workspace settings, choose the Billing tab to manage all billing related details. The sections in this tab allow you to:
- View your Workspace plan billing details
- View a site plan subscription summary
- View your invoicing settings
- View additional billing info
- View your account balances
- View all invoices for Workspace and site plans
- View a summary of your next bill
- View your payment card
Good to know: Billing details are only available to the Workspace owner and Workspace admins. Read more about Workspace roles and permissions.
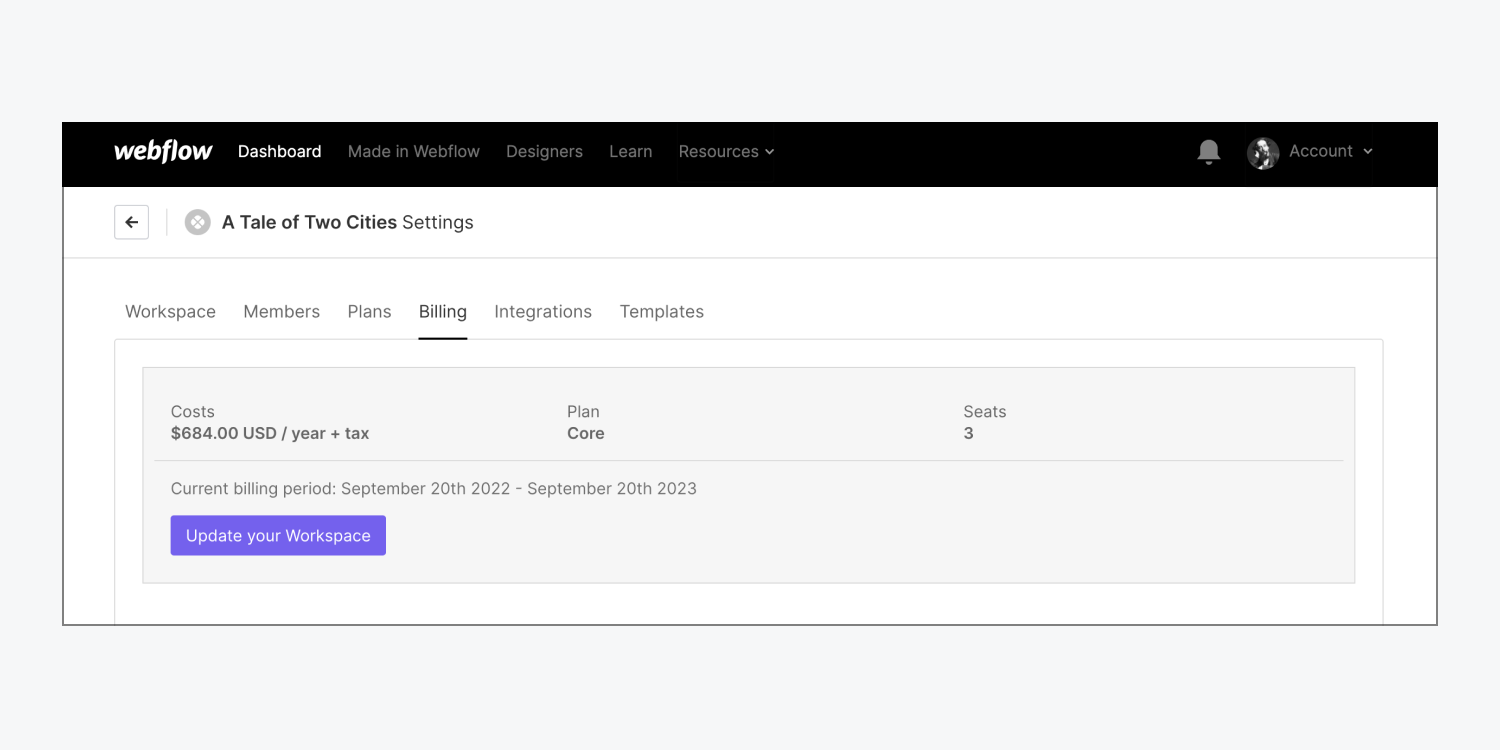
View your Workspace plan billing details
At the very top of the Billing tab, you can quickly see the costs and billing frequency of the paid Workspace plan you’re using, as well as the number of seats in your Workspace in the Workspace billing section. Click Update your Workspace if you need to upgrade or downgrade your plan, or switch its billing frequency.
View a Site plan subscription summary
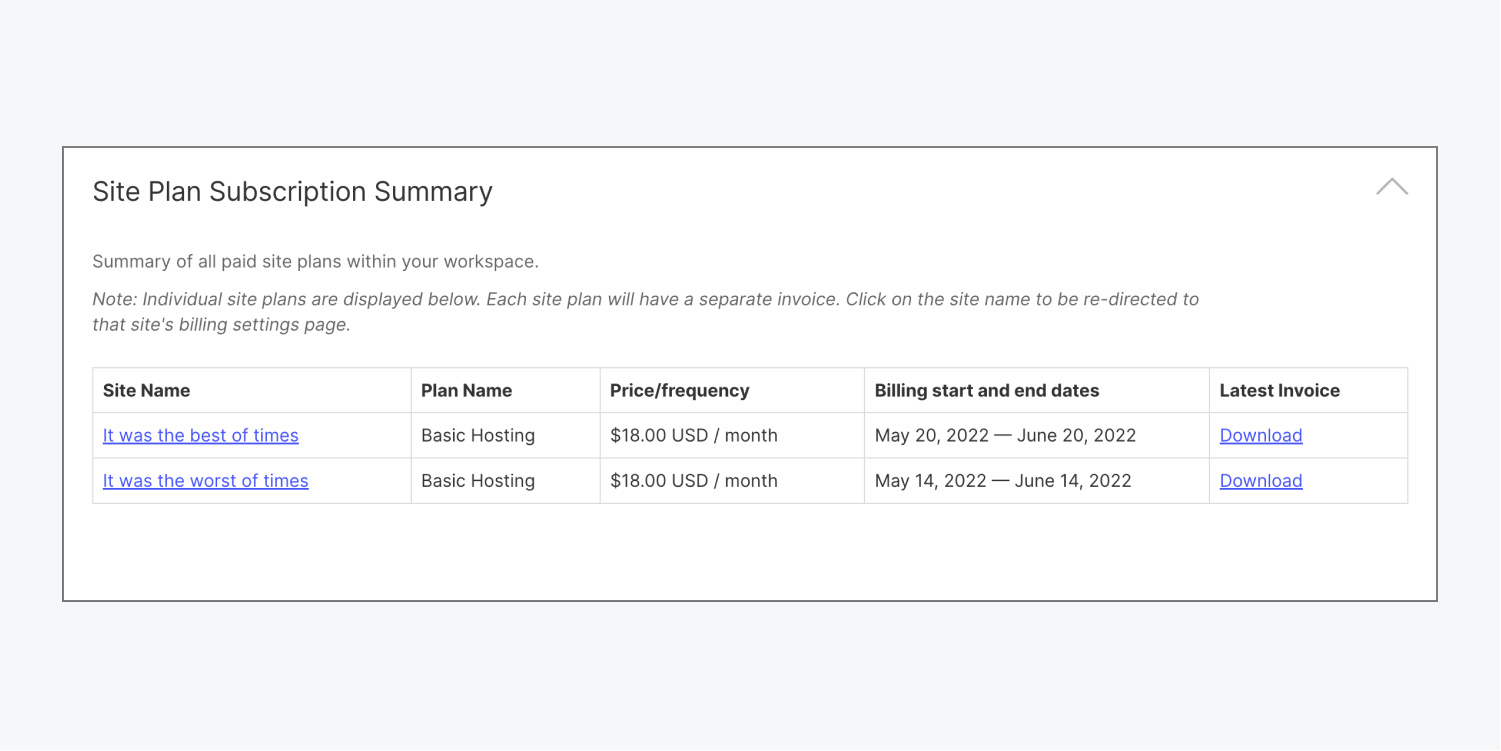
Note: Site plan subscriptions are invoiced separately from your Workspace plan subscription. The Site plan subscription summary section will only appear if you have active, paid Site plans on your sites.
Scroll down to the Site plan subscription summary section to get an overview of each of the Site plans you’re paying for within your Workspace. The information for each Site plan subscription includes:
- Site name — Click this to access that specific site's billing settings
- Plan name — Name of the active Site plan
- Price/frequency — How much you’re paying and when (per month or per year)
- Billing start and end dates — The date the plan was renewed and the date it will expire
- Latest invoice — Click Download to download the latest invoice for the site plan
View your invoicing settings
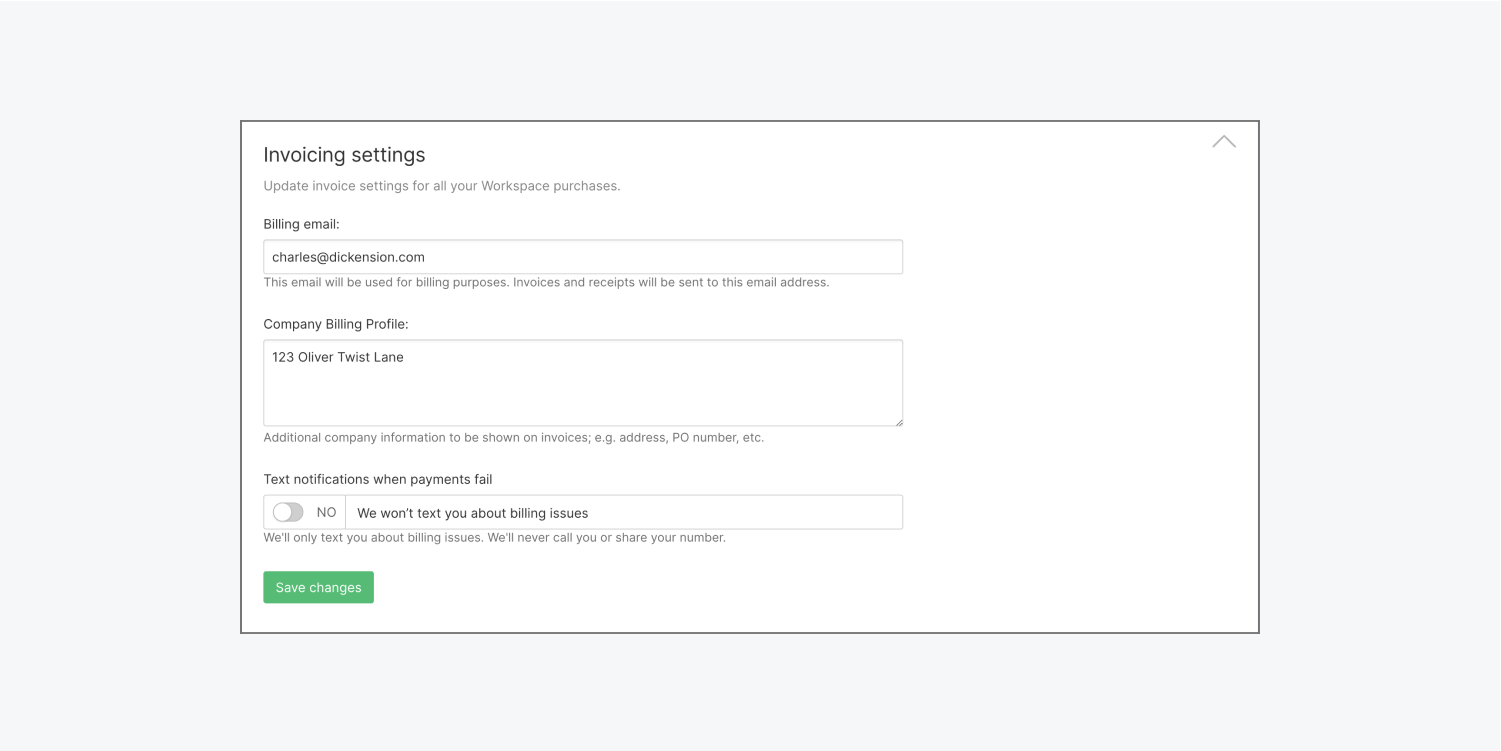
Scroll down to the Invoicing settings section to update your invoice settings for all your Workspace purchases, including Site plans. (This section only appears if you have a payment method on file.)
Add a billing email where invoices and receipts are sent. Receipts will include a link to download corresponding invoices.
Good to know: If no billing email is added, receipts will be sent to the Workspace owner’s email address on file.
Update your Company billing profile to include company information that you want to appear on invoices (e.g., address, PO number, etc.).
Choose whether to receive Text notifications when payments fail. If you turn this on, you can enter your preferred phone number, and will receive a text message to let you know about billing issues.
View additional billing info
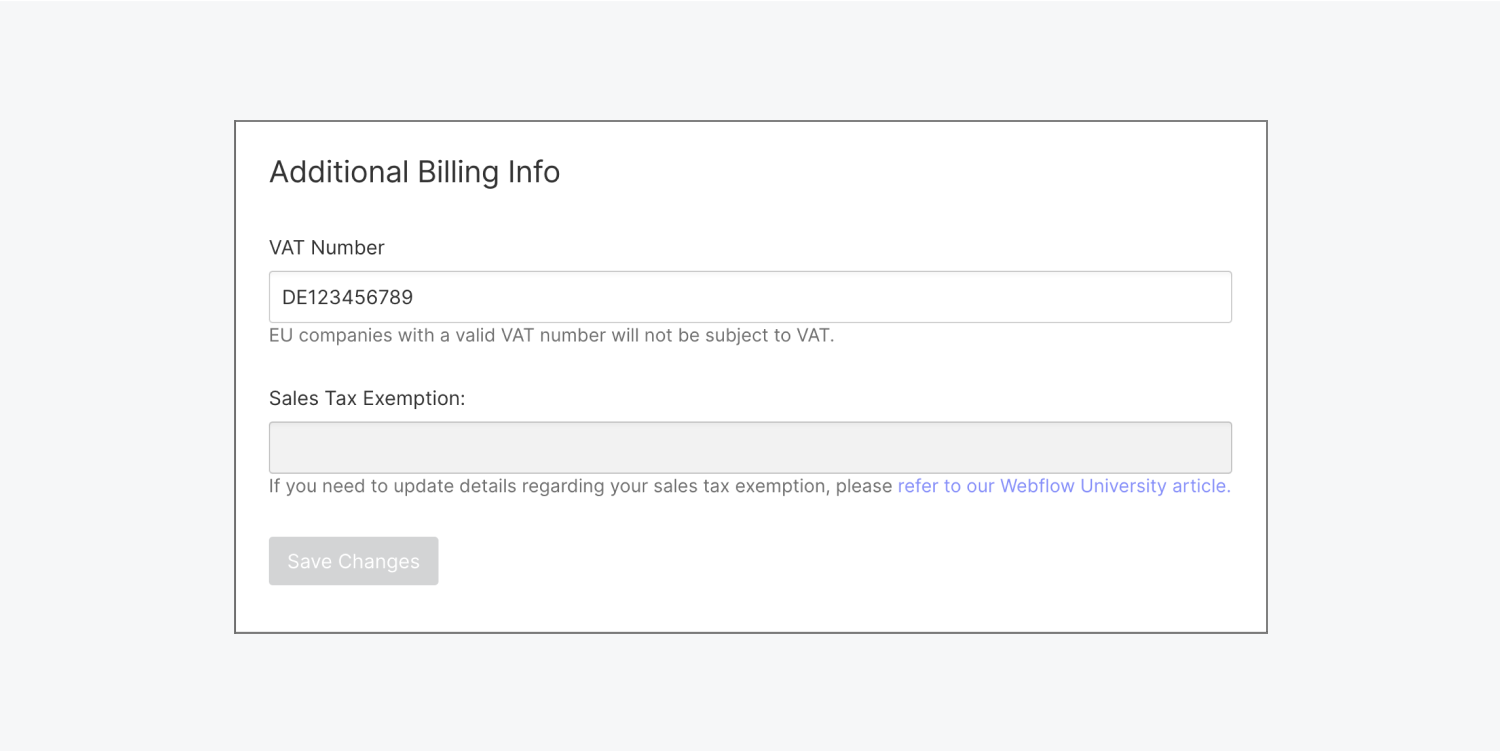
Scroll down to the Additional billing info section to update your VAT number and check on your Sales tax exemption status. Read more about VAT numbers and Sales tax exemption status.
Good to know: The VAT number field will only appear if your billing address is in a VAT ID supported country.
View your account balances
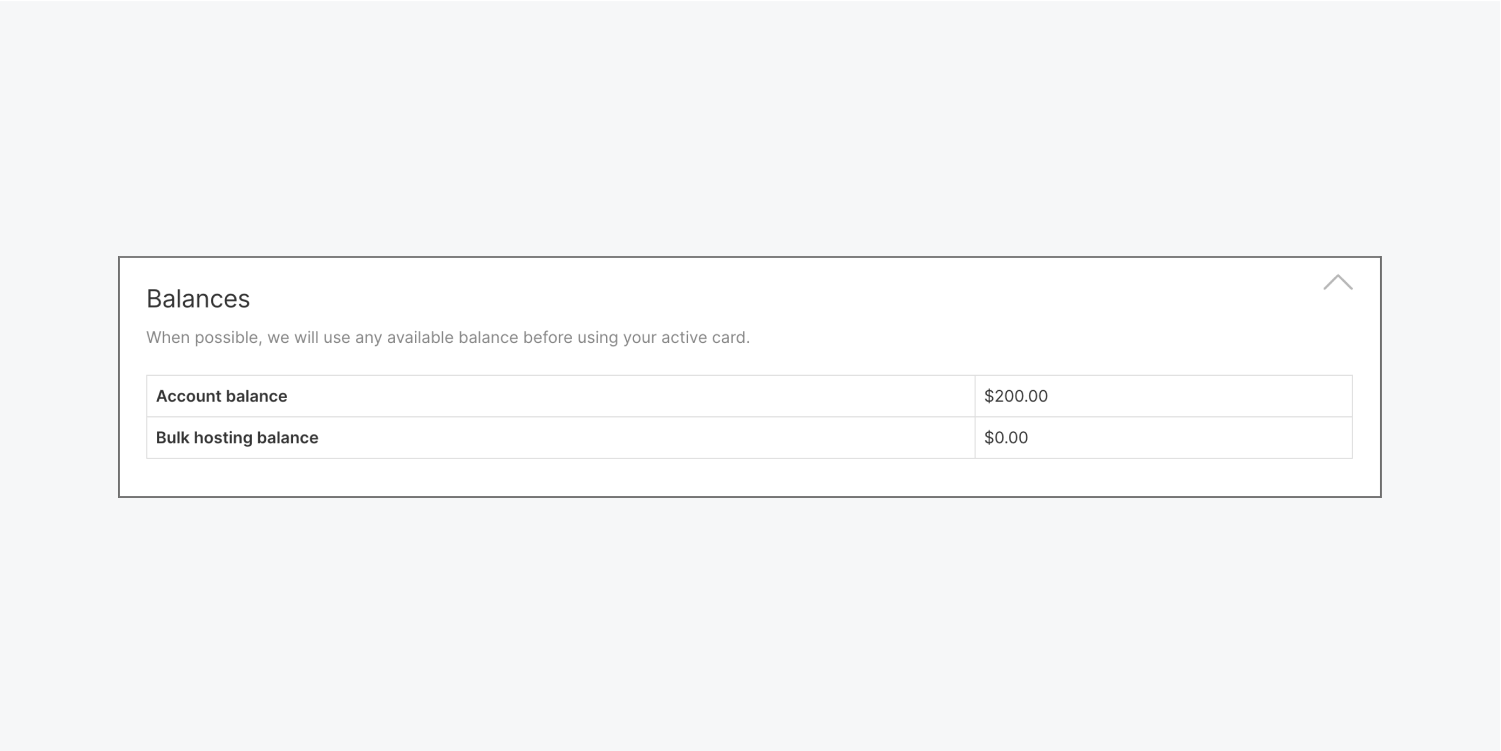
Scroll down to the Balances section to see available balances for your account and bulk hosting.
For example, you might have a positive account balance if you purchased a yearly plan, and downgraded to a monthly plan before your yearly plan had finished its billing cycle. The unused time on the yearly plan would be applied to your account as a credit, or a positive balance.
When making a payment for a plan, Webflow will use any available positive balance before using your active card on file.
Note: Account balance is not applied to template purchases.
View all invoices for Workspace and Site plans
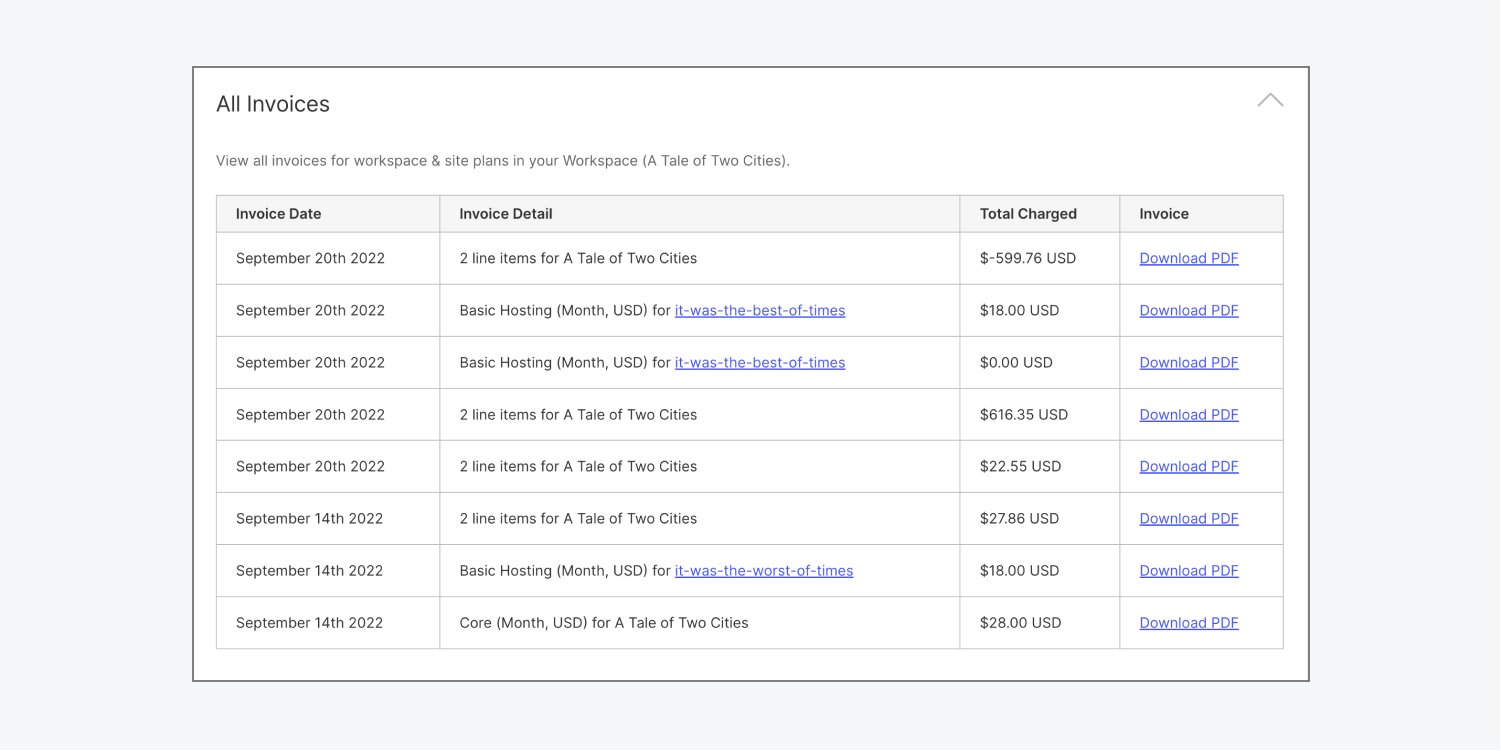
Scroll down to the All invoices section where all your Workspace and Site plan invoices are listed. Your 10 most recent invoices are visible by default, and you can click “Show more” to see additional, older invoices. The information for each invoice includes:
- Invoice date — The date your invoice was issued
- Invoice detail — What you were invoiced for
- Total charged — How much you paid (or were credited)
- Invoice — Click Download PDF to download the invoice
Note: Template invoices are not included in the All invoices section. You can find your template purchases and invoices in the Templates tab of your Workspace settings.
View a summary of your next bill
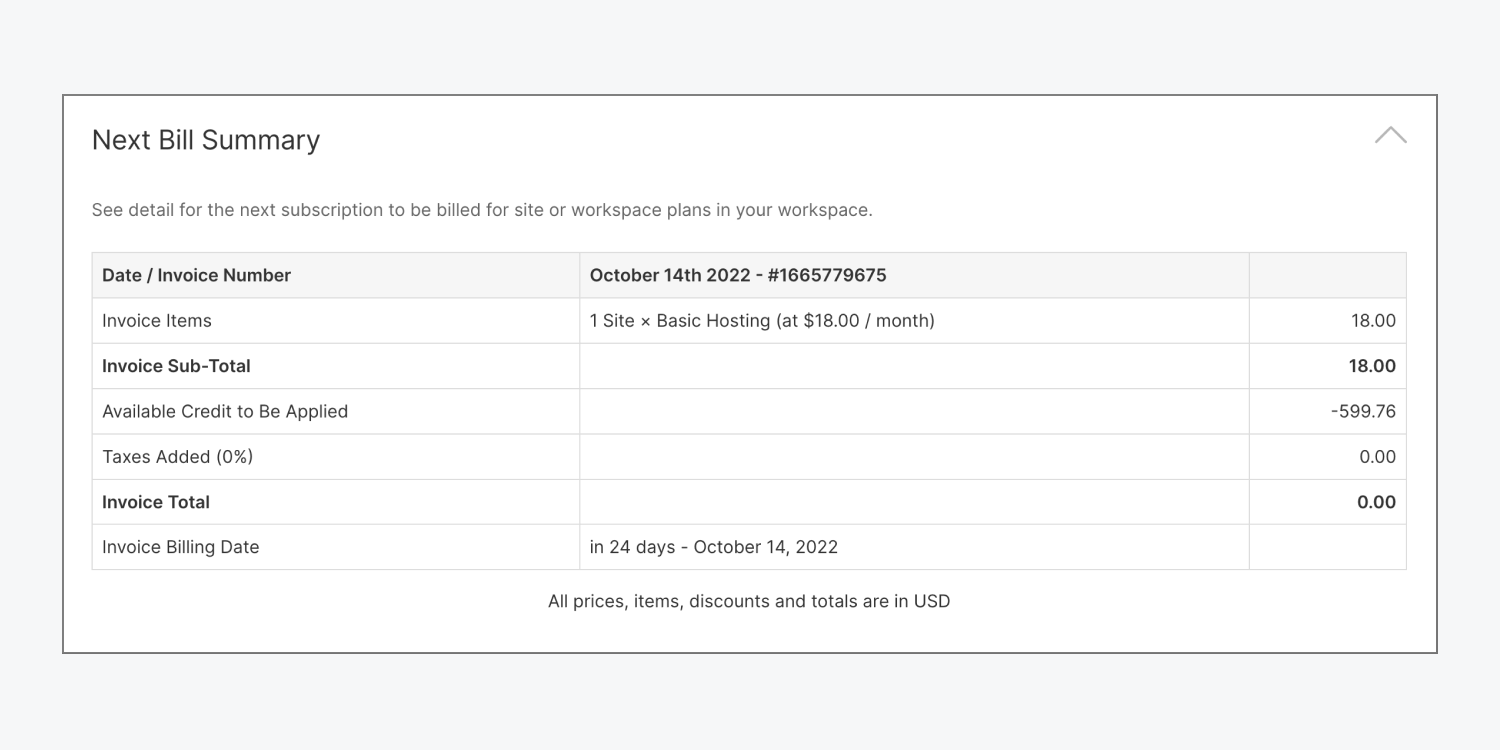
Scroll down to the Next bill summary section to view details about your next Site plan or Workspace plan payment. You’ll see information about the date and invoice number, invoiced items, any available credit that will be applied toward your total, and the invoice total. The invoice billing date also displays the number of days until the next payment attempt.
View your payment card
Scroll down to the Payment card section to manage your card on file. You can add a card as your payment method on file, view it, update it, and remove it. Learn more about supported card types and how to update your credit card on file.
Note: Your payment method on file is used to pay for all subscriptions that fall under your Workspace — this includes Workspace plans and Site plans.

Integrations tab
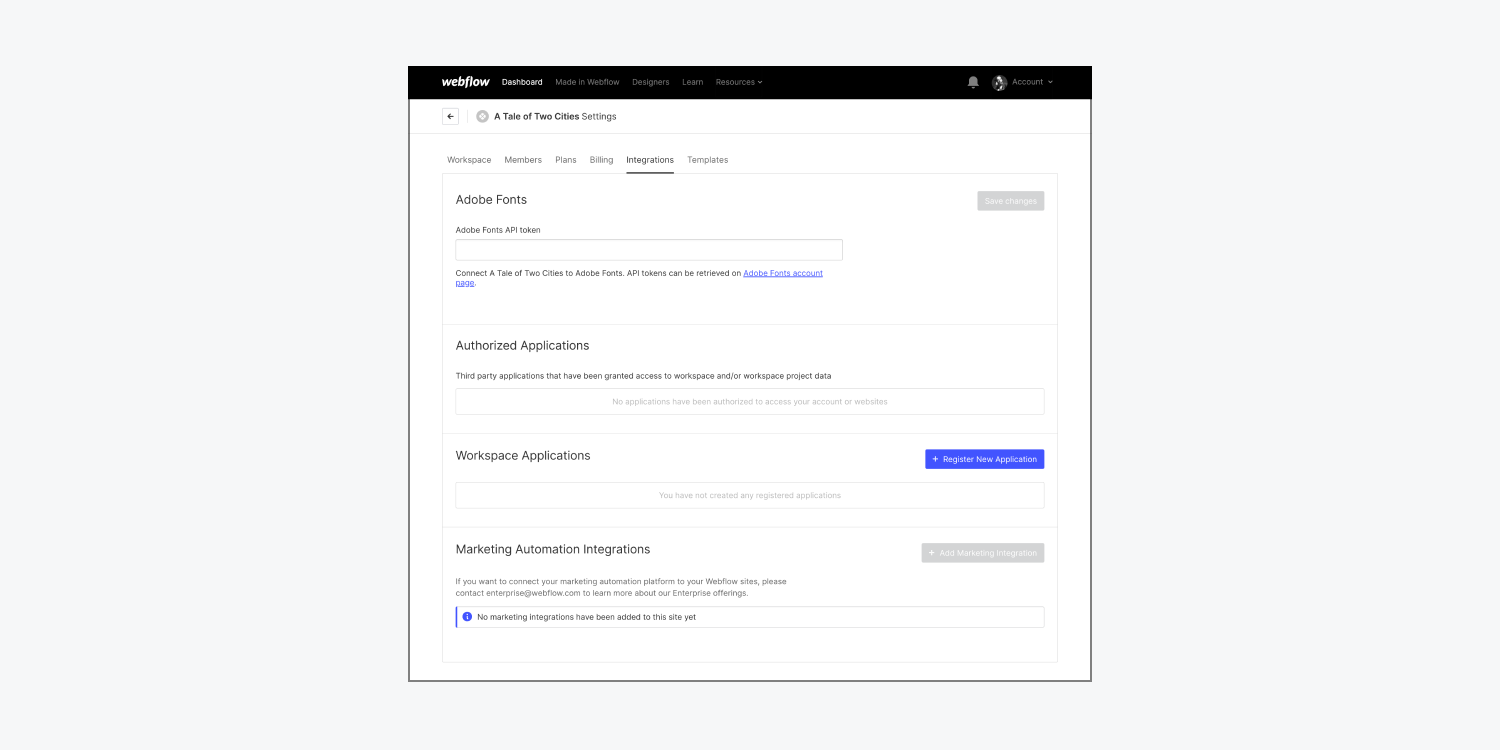
After opening your Workspace settings, choose the Integrations tab to manage your third-party integrations under the following sections:
- Adobe fonts
- Authorized applications (e.g., Zapier, Jetboost, etc.)
- Workspace applications (e.g., your registered application that you created)
- Marketing automation integrations (e.g., Marketo, Hubspot, etc.)
Templates tab
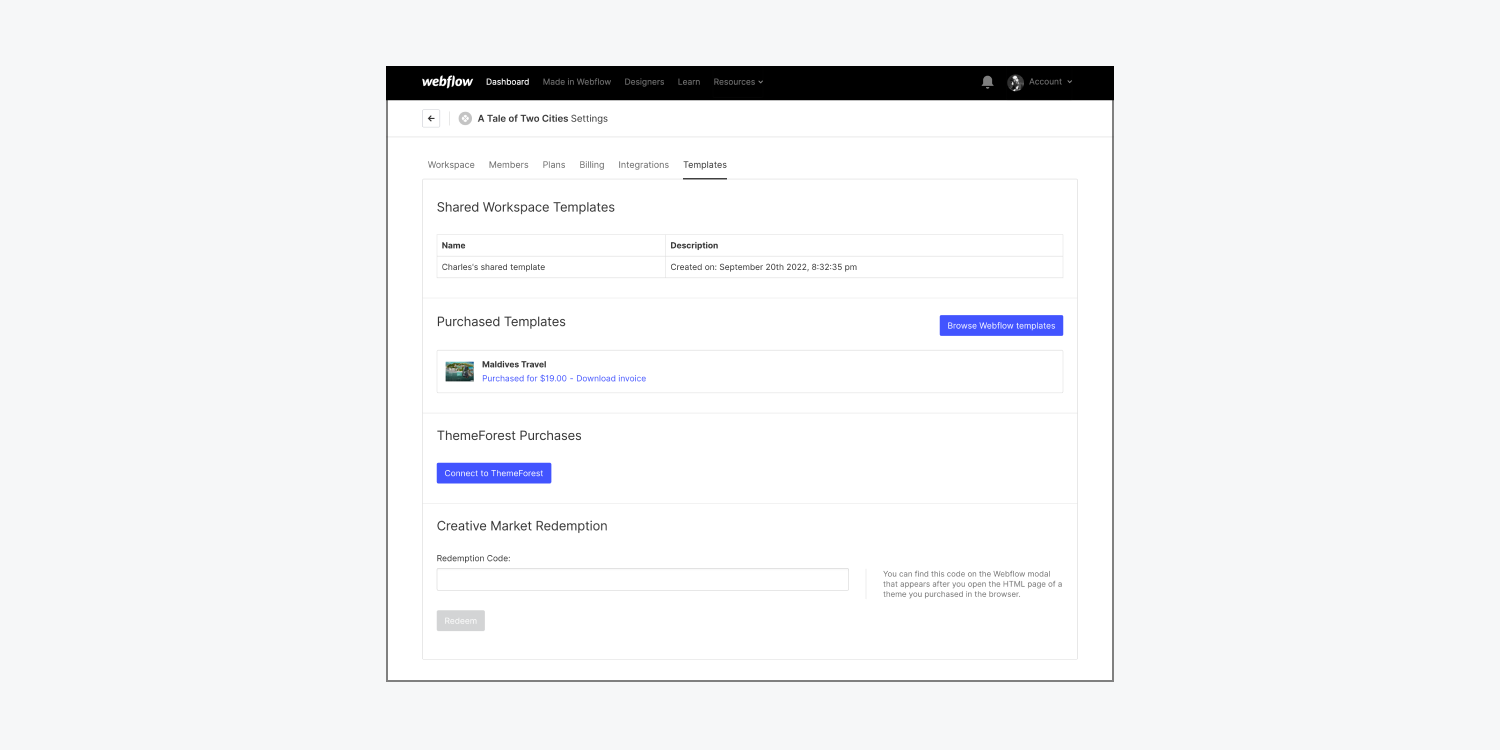
After opening your Workspace settings, choose the Templates tab to view all details related to templates.
Scroll to the Shared Workspace templates section to view any sites you’ve set up to be used as a shared Workspace template.
Scroll to the Purchased templates section for a list of your purchased templates and their details. You can view the purchase price for each, and can download each template’s invoice. You can also browse Webflow’s template marketplace. Learn more about Webflow templates and how to use them.
Scroll to the ThemeForest purchases section to connect to ThemeForest. Learn more about connecting to ThemeForest.
Scroll to the Creative Market redemption section to add a redemption code. Learn more about redeeming a Creative Market template purchase.
How to upgrade your Workspace plan
You can upgrade your current Workspace plan to a different plan:
Good to know: Yearly pricing gives you the ability to pay for a plan up front at a discounted rate. Paying for a plan up front can save up to 32% compared to paying monthly.
- Open your Dashboard
- Choose your free Starter Workspace from the Workspaces dropdown menu in the top left of the Dashboard
- Click the “cog” icon to open your Workspace settings
- Choose the Plans tab
- Toggle Billed monthly or Billed yearly
- Click the “Upgrade” button of the plan you want to purchase (choose a plan from either the “For in-house teams” tab or the “For freelancers & agencies” tab)
- Select the number of seats (you can always add or remove seats later if you need to)
- Add your payment information
- (Optional) Enter a promo code if you have one
- Pay for your plan
Note: if you want to keep your free Starter Workspace plan for yourself, but add a new, paid Workspace plan for teammate collaboration, follow the steps outlined in How to create a new Workspace.
How to switch your Workspace plan’s billing frequency
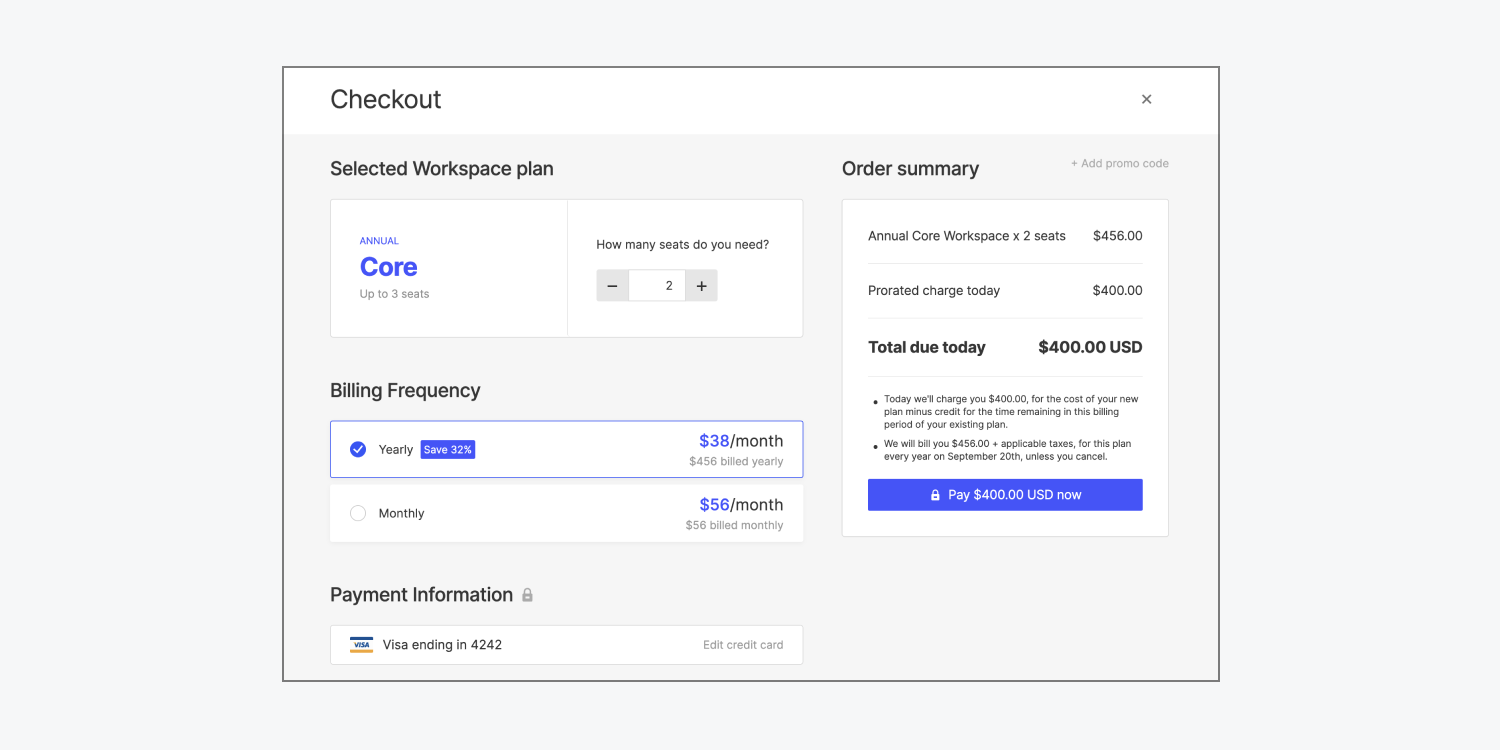
You can switch the billing frequency of your Workspace plan without having to cancel your current plan. The prorated amount you pay for your new billing cycle is visible at checkout.
For example, if you switch from a monthly Core Workspace plan to a yearly one, you’ll be credited for any unused time on the monthly plan, which reduces your total yearly plan price.
If you switch from a yearly Workspace plan to a monthly one, you’ll receive account credit for the unused time on the yearly plan. Your account credit will then be applied to any future plan charges before your credit card is charged.
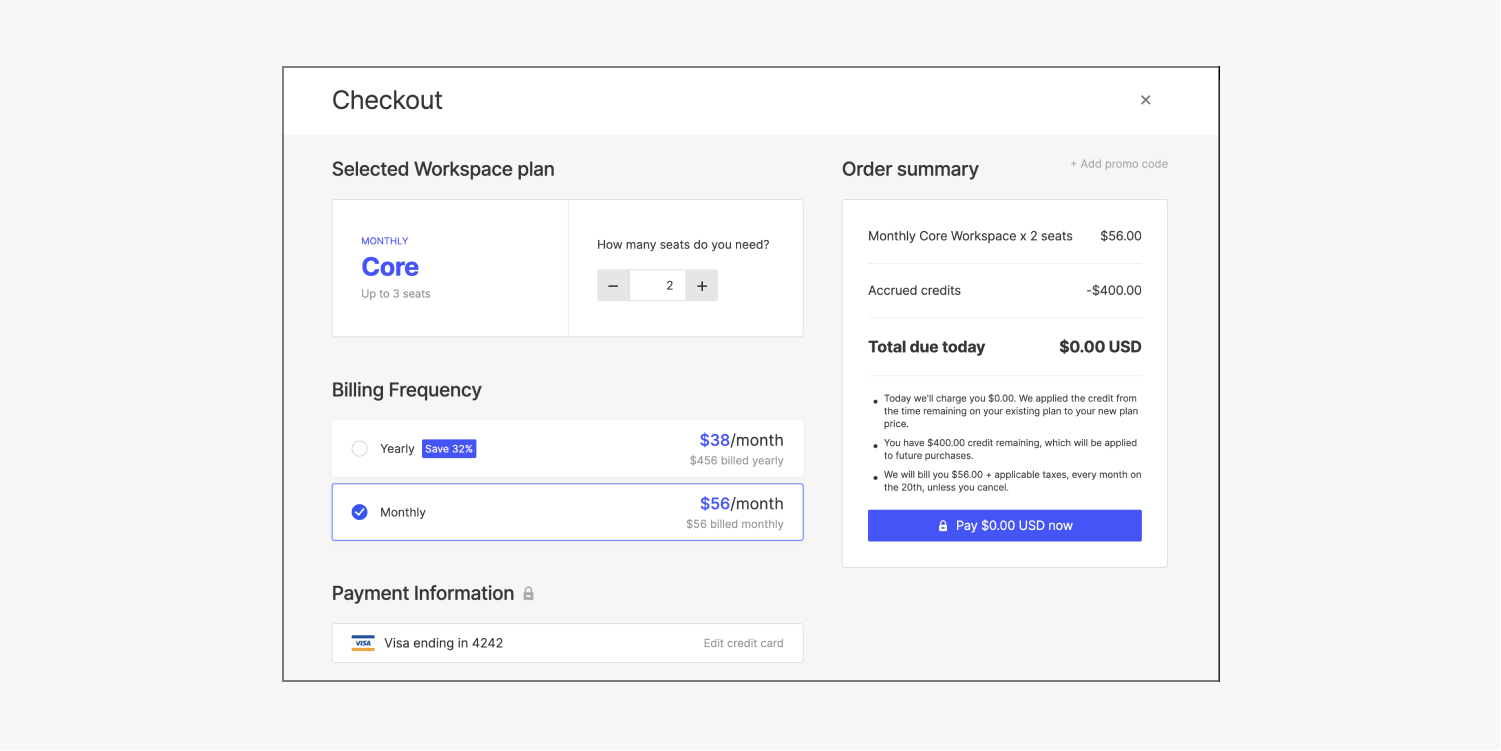
Switch from a monthly Workspace plan to a yearly Workspace plan
- Check that you are in the correct Workspace
- Click the “cog” icon to open your Workspace settings
- Choose the Plans tab
- Toggle “Billed yearly” to display yearly plan pricing
- Click “Switch to yearly” under your current Workspace plan
- Pay for your plan
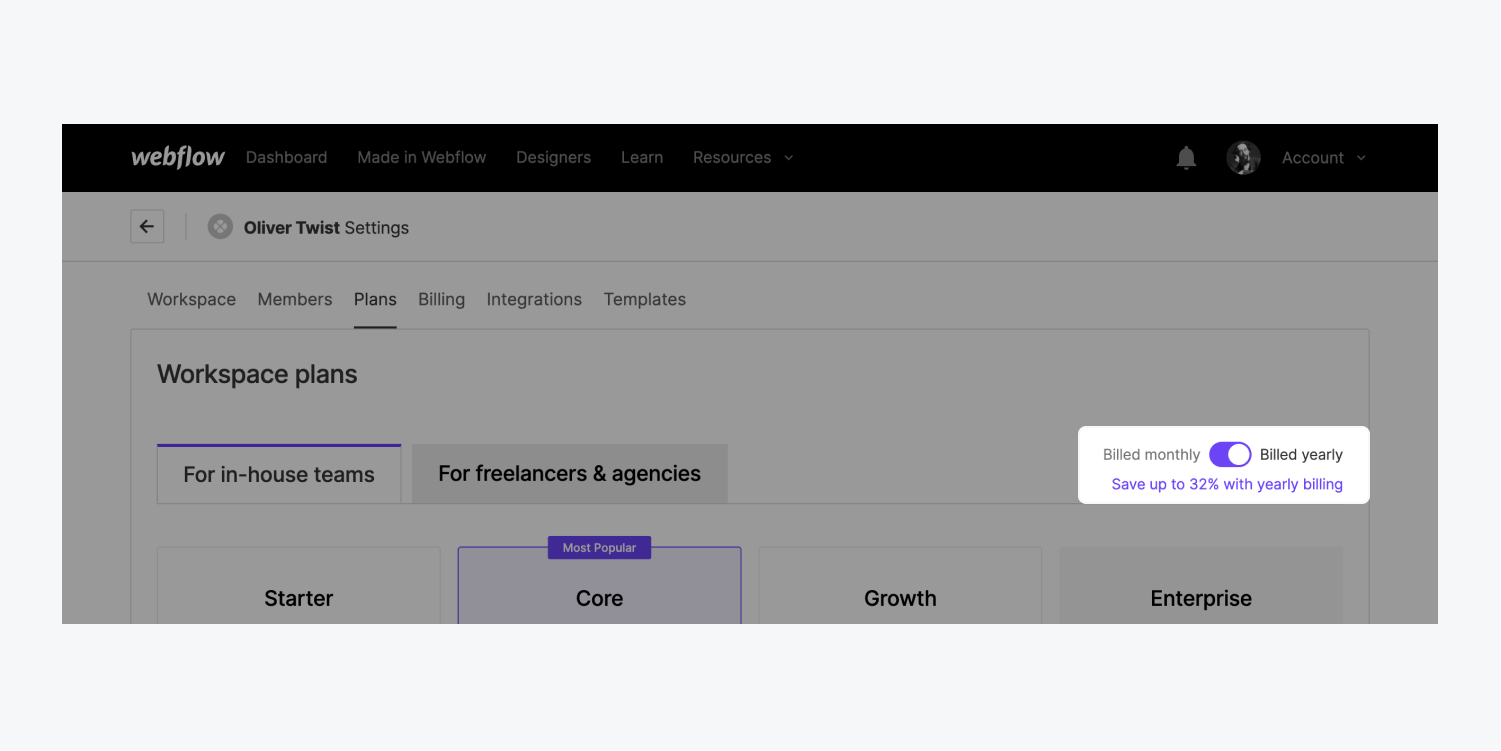
Switch from a yearly Workspace plan to a monthly Workspace plan
- Check that you are in the correct Workspace
- Click the “cog” icon to open your Workspace settings
- Choose the Plans tab
- Toggle “Billed monthly” to display monthly plan pricing
- Click “Switch to monthly” under your current Workspace plan
- Pay for your plan
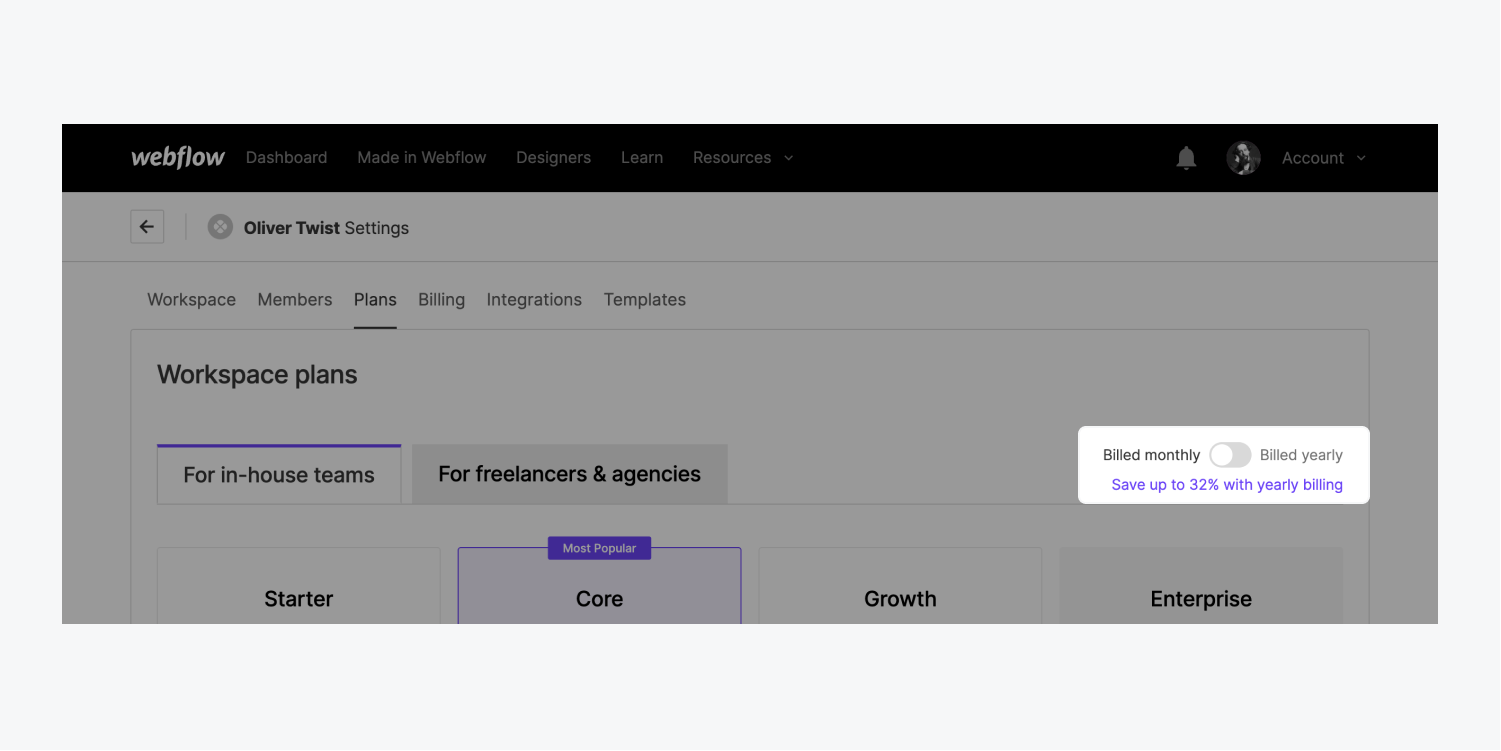
How to downgrade your Workspace plan
You have the option to downgrade your Workspace plan if you need to:
Downgrade to a lower paid Workspace plan
- Check that you are in the correct Workspace
- Click the “cog” icon to open your Workspace settings
- Choose the Plans tab
- Toggle Billed monthly or Billed yearly
- Click “Downgrade” under the lower, paid Workspace plan
- Adjust the number of seats to fit your new plan limits (you may be prompted to remove team members and pending member invites before being able to downgrade)
- Remove any unhosted sites that don’t fit within your new plan limits (scroll below the plans list to view “All Workspace features”, which outlines the number of unhosted sites available on each plan)
- Add your payment information
- (Optional) Enter a promo code if you have one
- Click Pay now to downgrade to the lower plan (your total due will be indicated on the "Pay now" button)
Downgrade to the Starter Workspace plan
Good to know: Only 1 Starter Workspace is allowed per user. If you would like to downgrade a paid Workspace plan to a Starter Workspace and already have 1 Starter Workspace in existence, you’ll need to delete your existing Starter Workspace before you can downgrade.
- Check that you are in the correct Workspace
- Click the “cog” icon to open your Workspace settings
- Choose the Plans tab
- Click “Downgrade to Starter” under the Starter Workspace plan
- Adjust the number of seats to fit your new plan limits (you may be prompted to remove team members and pending member invites before being able to downgrade)
- Remove any unhosted sites that don’t fit within your new plan limits (e.g., you can have up to 2 on the Starter plan)
- Select the reason you are downgrading your plan and type DOWNGRADE in all caps
- Click “Downgrade plan” to confirm
How to add and remove seats on a Workspace plan
A seat is a spot that’s filled by a team member in your Workspace. You can add and remove seats from your Workspace plan to create a flexibly sized, collaborative space that fits your unique needs. Let’s walk through how you can:
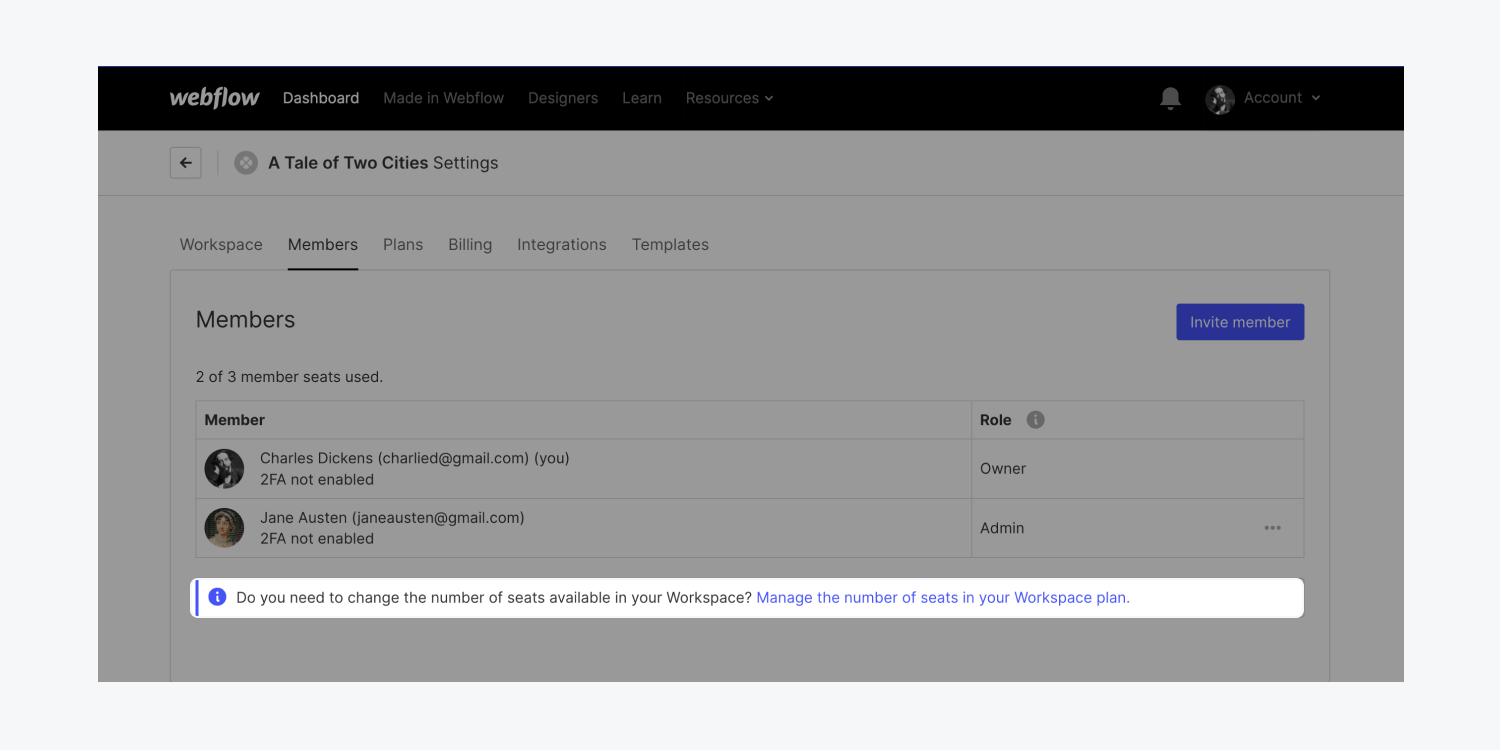
Add seats to your Workspace plan
Good to know: By default, the Starter Workspace plan contains only 1 seat for you, the Workspace owner. You will need to upgrade to a paid Workspace plan to be able to add more than 1 seat. Or, you can keep your Starter Workspace for your individual work, but create a new, additional paid Workspace to use when collaborating with teammates.
You can add a maximum of 3 seats on the Core or Freelancer plans, and a maximum of 9 seats on the Growth or Agency plans. An Enterprise plan offers a custom number of seats.
Note: When purchasing a Workspace plan that gives you the ability to add more seats, you will first start out with 1 seat, and have the option to add and purchase a maximum of the number of seats allowed on the plan (e.g., a maximum of 3 seats for a Core plan).
Once you’re on any paid Workspace plan, you can adjust the number of seats within that plan:
- Check that you are in the correct Workspace
- Click the “cog” icon to open your Workspace settings
- Choose the Members tab
- Click “Manage the number of seats in your Workspace plan” under the list of members in your current plan.
- Increase the number of seats on your plan in the Checkout modal (you will be prompted to upgrade to a higher plan if the number of seats that you need exceeds your current plan’s limits)
- Click Pay now to add the seats to your plan (your total due will be indicated on the "Pay now" button)
Remove seats from your Workspace plan
Good to know: By default, all Workspaces require at least 1 seat for you, the Workspace owner.
To remove seats from a paid Workspace plan:
- Check that you are in the correct Workspace
- Click the “cog” icon to open your Workspace settings
- Choose the Members tab
- Click “Manage the number of seats in your Workspace plan” under the list of members in your current plan.
- Decrease the number of seats on your plan in the Checkout modal (you will be prompted to remove active team members from your plan if your reduced seat count is fewer than the number of team members in your Workspace)
- Click Pay now to finalize your new seat count in your plan (your total due will be indicated on the "Pay now" button)
How to add and remove Workspace members
Team members fill available seats in your Workspace. You can add new members to fill open seats, and can remove members to reopen seats for newly invited members. Let’s walk through how you can:
Add members to your Workspace
If you have open seats in your Workspace plan, you can invite new members to fill those seats. If you don’t have open seats available, you will be prompted to upgrade your Workspace plan to add more seats.
To invite a new member to fill an open seat in your Workspace:
- Check that you are in the correct Workspace
- Click the “cog” icon to open your Workspace settings
- Choose the Members tab
- Click “Invite member”
- Type in the member’s email address and select their role
- Invite them to your Workspace
The member will receive an email notifying them that you have invited them to your Workspace. You’ll also see the new member has a “pending invite” status in the Members tab of your Workspace settings, which will remain in effect until that member has accepted your invitation.
Before the member has accepted your invitation, you also have the option to cancel the invite or resend it. Click the 3 disclosure dots to the right of the member’s pending invite status and choose Cancel invite or Resend invite.
After you’ve added members to your Workspace, you can manage their roles and permissions within your Workspace. If you’re on a Growth or Agency plan, in addition to Workspace roles and permissions, you can also manage their site level permissions on a site-by-site basis. Learn more about roles and permissions.
Remove members from your Workspace
Important: Removing members from a Workspace does not also reduce the number of seats on your plan. If you want to also remove an open seat after removing a member, please remove seats from your Workspace plan.
To remove a member from your Workspace:
- Check that you are in the correct Workspace
- Click the “cog” icon to open your Workspace settings
- Choose the Members tab
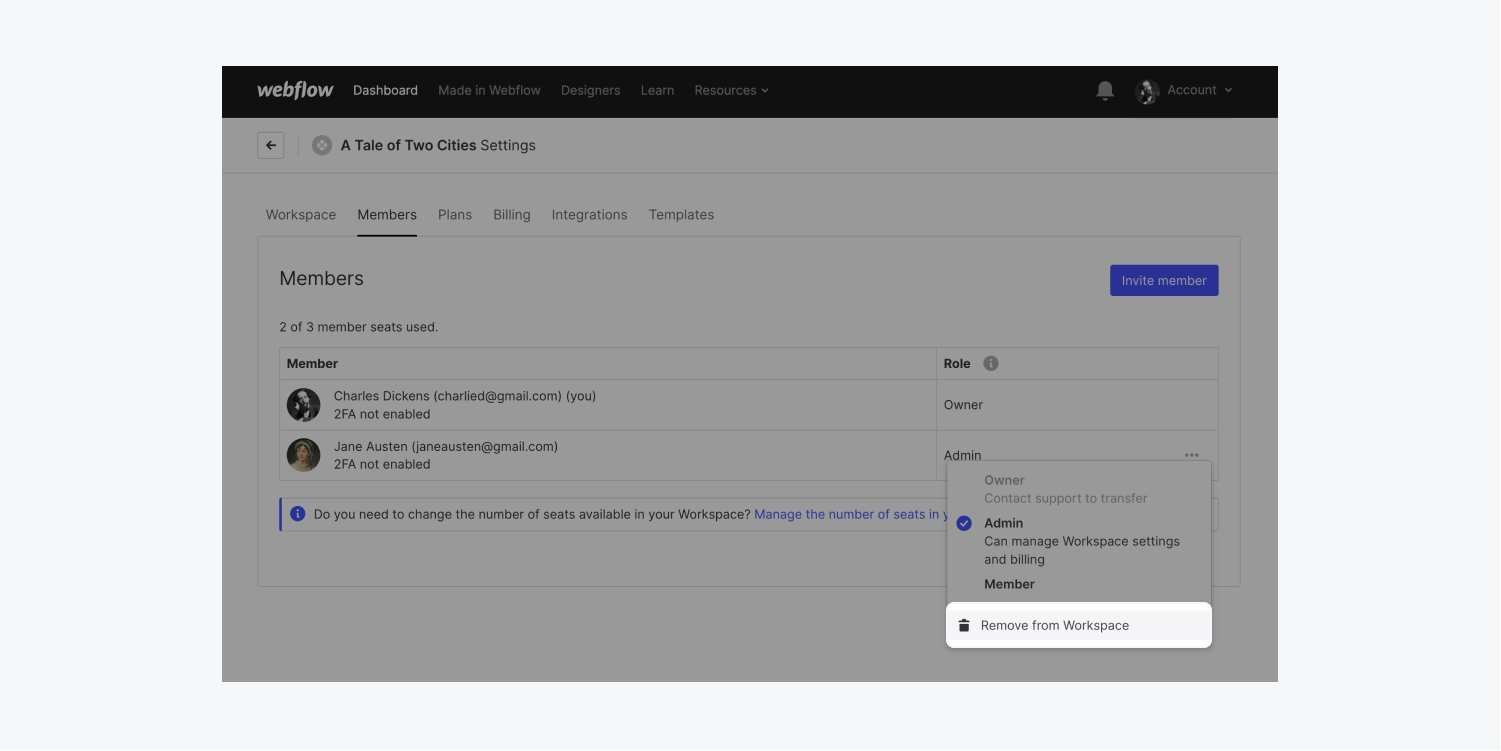
- Click the 3 “disclosure dots” to the right of the member’s role
- Choose “Remove from workspace”
- Type REMOVE to confirm
You now have an open seat available and can invite a new member to fill that seat, or remove that seat if you no longer need it.
How to delete a Workspace
Important: Only Workspace owners can request to delete a Workspace. You can’t recover a deleted Workspace — once it’s deleted, it’s gone forever.
To permanently delete your Workspace, you must first cancel all Site and Workspace plans connected to your Workspace, and then contact customer support.
How to understand proration and refunds
Webflow prorates plan changes (downgrades, upgrades, or billing frequency switches) based on your existing balance, credits, and how many days you have remaining in your billing cycle. Your prorated charge and credits are visible at checkout.
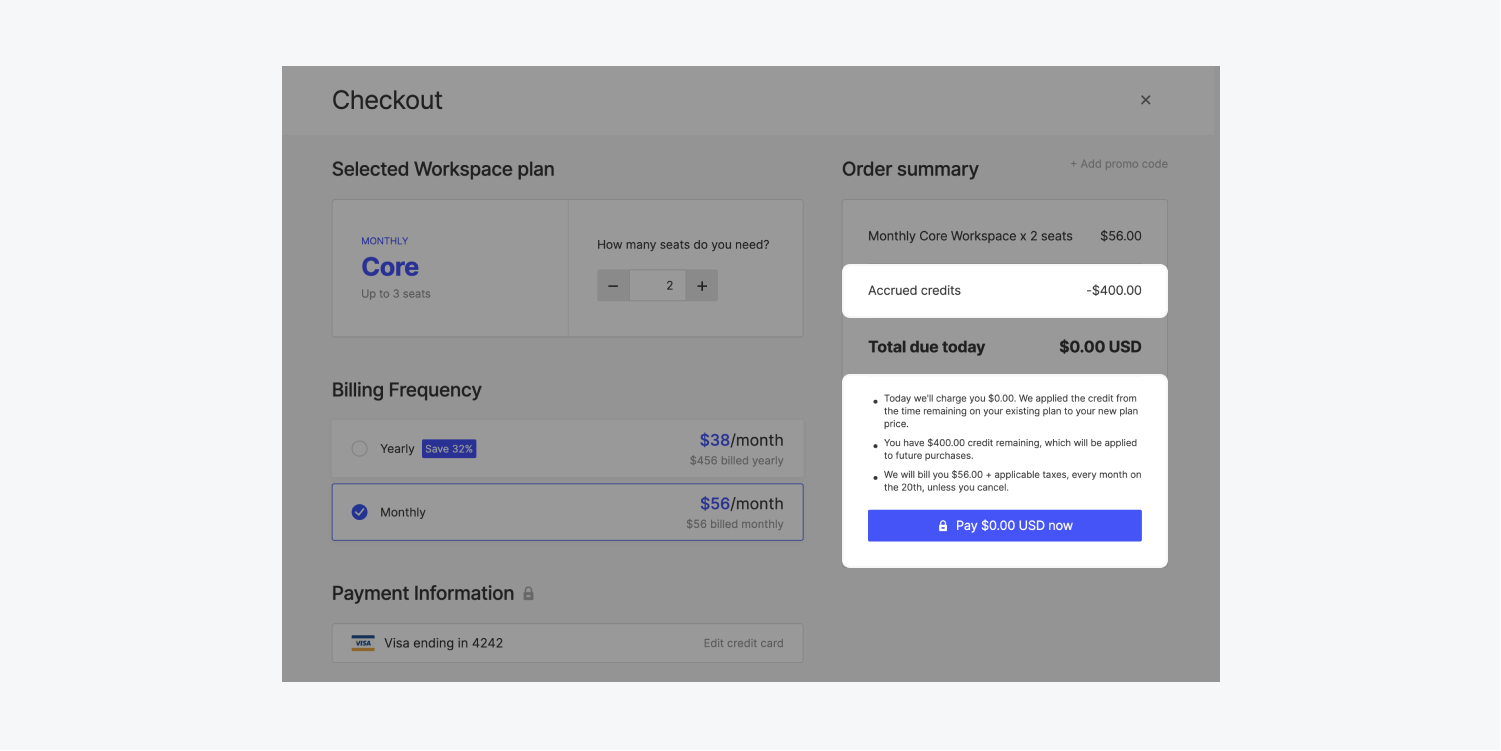
If you want to make any changes to your plan, you can determine an estimate of your prorated charge with the following equation:
- (current monthly price ÷ 30) x (days left in billing period) - (new monthly price ÷ 30) x (days left in billing period) = Total prorated charge or credit
The exact charge or credit at the time of your plan change may differ slightly from these calculations.
Note: We generally do not provide refunds (please refer to section 9 of our Terms of Service), and we do not automatically issue account credit for unused time on a canceled Workspace plan. However, we understand mistakes sometimes happen. If you feel you have canceled your Workspace plan in error, contact customer support and they can evaluate whether you are eligible for an account credit, a promo code, or a refund.


